Tutorial: How to parse OpenAI JSON in Bubble to build powerful AI features.
Welcome to this week's edition of the NoCode SaaS Newsletter, where I take you along on the journey to building profitable SaaS software in Bubble.
This week I’ve put together a tutorial on how to handle using JSON generated by OpenAI in Bubble.
The technique I share powers some of the most popular AI features in my own apps - if you can master this you can build some unbelievable things in Bubble that most people don’t think are possible.
In the tutorial, I take you through step by step how to build an app which converts news articles into social posts, extracts keywords and creates hashtags - all via a single API call to OpenAI.
Watch my free tutorial on how to parse OpenAI JSON in Bubble
Here are a few of the key things to note about this technique.
Setting up OpenAI in the Bubble API Connector
I’ve covered this in a previous issue but there are a few tweaks based on recent features added to the OpenAI API - primarily support for always getting a response in JSON format with no other text.
Here’s how it looks in the Bubble API Connector:
Here’s a copy of the Body JSON to help you get started with setting this up. The additional thing to note is the extra param for response_format = type: json_object.
This means OpenAI will always respond to this request with a JSON object - but beware, you must explicitly ask for JSON in your prompt too, otherwise you’ll get an error.
Body JSON Object
{
"model": "<model>",
"response_format": { "type": "json_object" },
"messages": [
{"role": "system", "content": <role>},
{"role": "user", "content": <prompt>}
]
}
Once you’ve got your OpenAI API call set up the next step is to head over to your backend workflows page in Bubble to set up our workflow.
Setting up your Backend Workflow
Create a new backend workflow, and make it publicly accessible. You can add authentication to it if you like but we aren’t for the purposes of this tutorial.
Add an initial step to your workflow calling the action we just set up in the API connector to run the OpenAI Chat API.
Create a single parameter to pass in your article text from the front end to the OpenAI prompt later on.
Once you’ve got your workflow created, we just need to add 2 steps to it - it’s not as complicated as you think!
The first step is the OpenAI Chat action that we just set up in the API Connector.
We need to fill in the OpenAI model we want to use, in this example gpt-4-turbo.
Then we need to fill out the role for our request, to tell the AI what we want to do. You’ll see in the example below we give instructions that we want to provide an article text and get back a list of social posts, keywords and hashtags.
Critically, we then also provide an example of the JSON response we’re expecting. You can either write this by hand or use ChatGPT to generate one.
Here’s an example:
{
"LinkedIn_post": "Example LinkedIn post content here",
"Twitter_post": "Example tweet content here",
"Reddit_post": "Example Reddit post content here",
"keywords": ["keyword1", "keyword2"],
"hashtags": ["#hashtag1", "#hashtag2"]
}
Then finally we need to fill out our prompt. This is fairly simple, we just tell the model that we’re providing the original article text that it needs to summarize. Then you inject the article variable you created in your workflow.
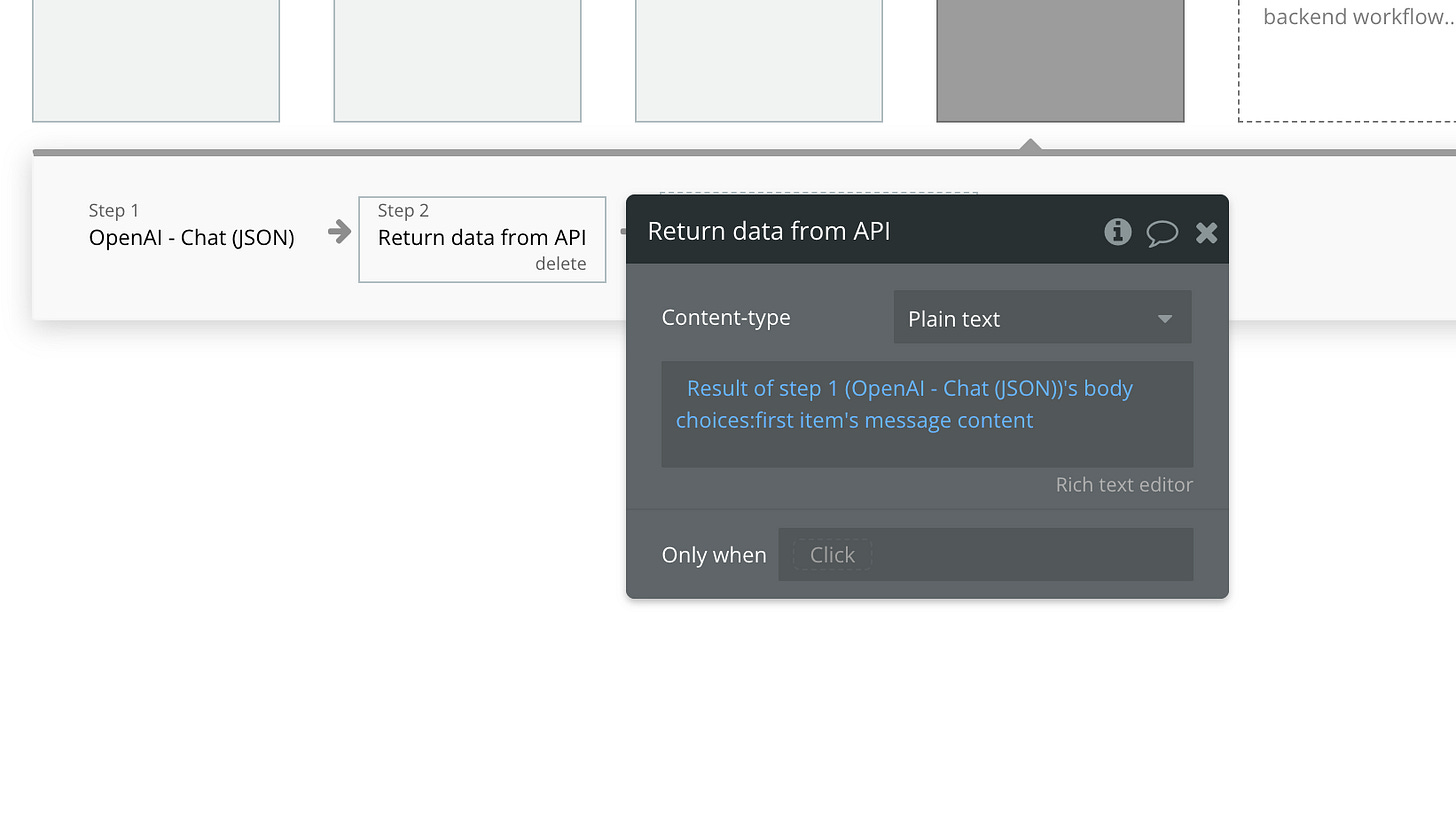
Once you’ve done that, we just need to add one more step to our workflow - Return data from API. This is then going to take the JSON output from the first step of our workflow, and return that JSON back.
Here’s how that looks:
So - whenever we make a request to this backend workflow, the OpenAI step will run, and then the resulting JSON will be returned.
That’s all we need to do with setting up the backend workflow.
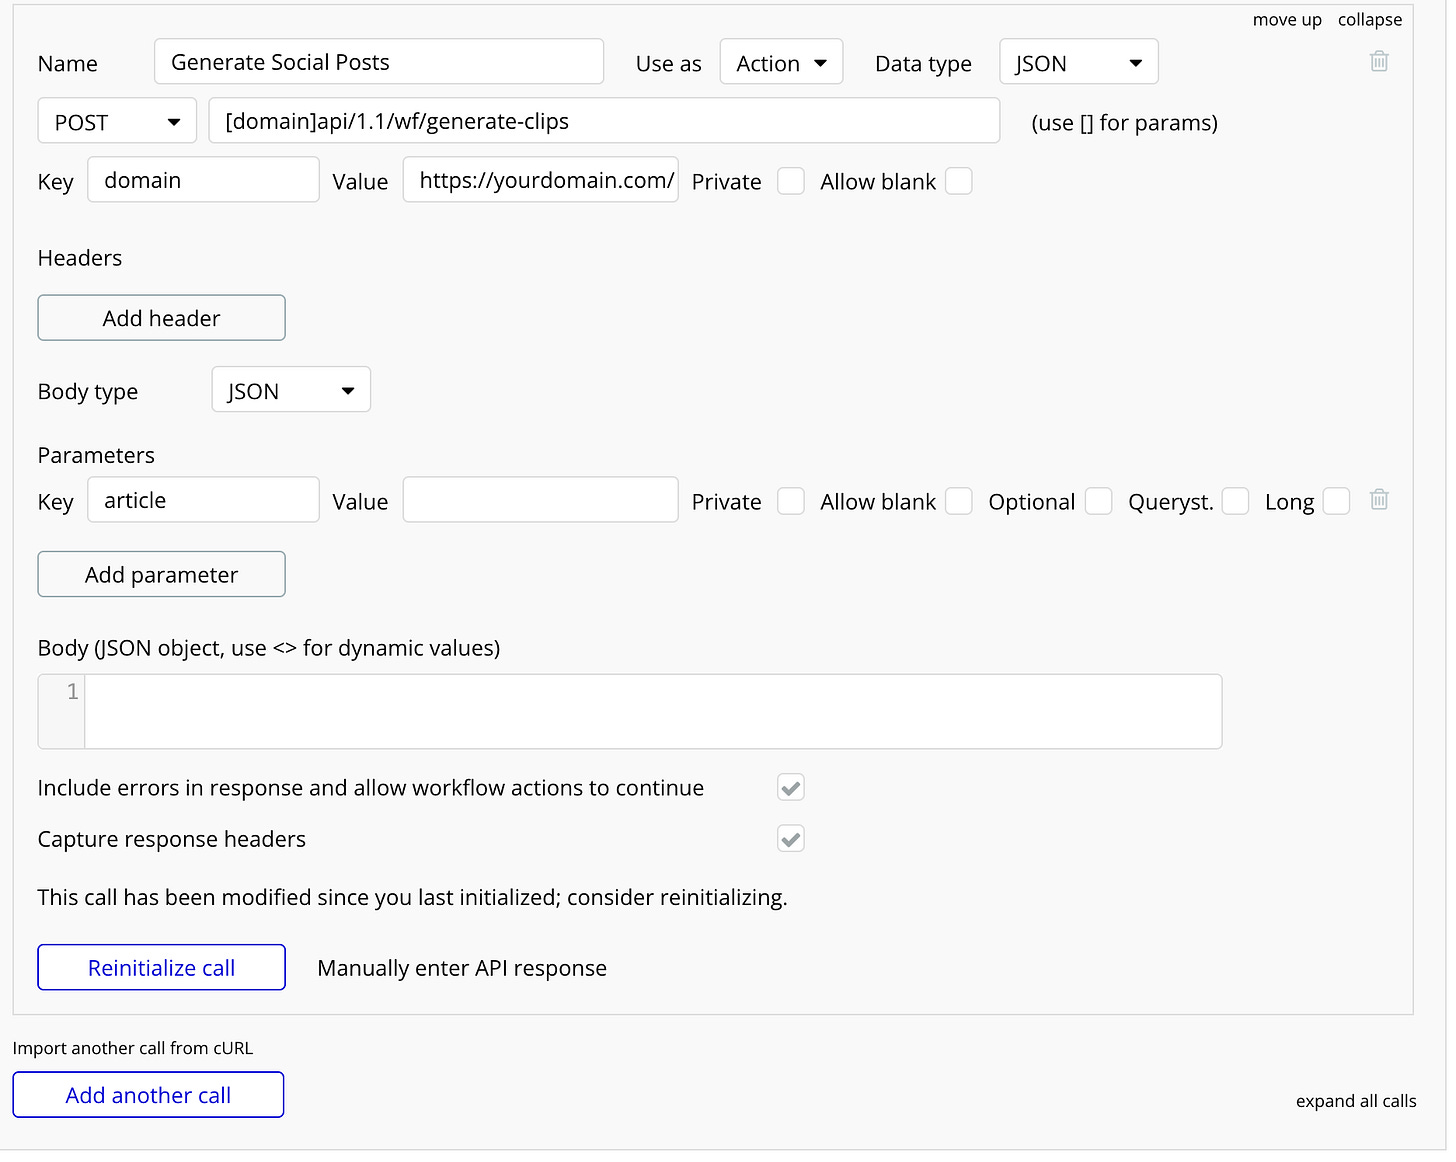
The final step we need to do is to head back to the API connector and add a new endpoint to call this workflow from inside our app.
Calling your API workflow from within Bubble
So now comes the clever part, we want to call our backend workflow in our own app, via the API connector.
This means our front end can call this API, have all the steps run on the backend, and be returned the resulting JSON which can be rendered in the front end.
To do this, I recommend setting it up as an action.
To call your request you’ll need to call this API:
https://yourdomain.com/version-test/api/1.1/wf/your-workflow-name
Replace with your domain and backend workflow name.
In production, I recommend making the domain a variable - this means you can inject it in the workflow you run to make sure you’re always calling the right environment (live/dev/etc)
Then we just need to add the single parameter for article - where the content of the article will be sent and initialize the call.
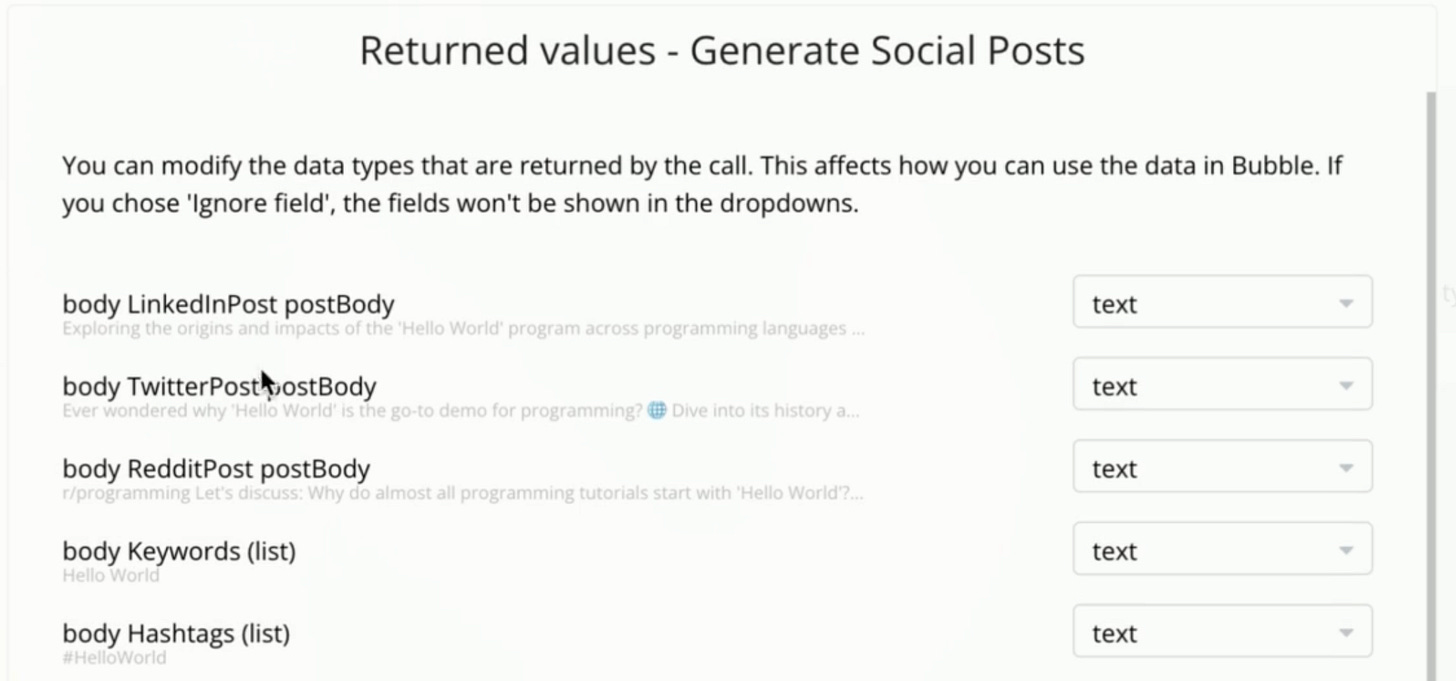
Then you’ll see we get back all our content properly formatted from OpenAI, split up into the sections we wanted and recognised by Bubble, ready for us to use anywhere in our app.
The final step is to hook up our front end to call this new API and display the data in our front end.
As you can see we’ve made a simple UI. To accept the article on the left and show the outputs from OpenAI on the right.
I go into this in much more detail in the video tutorial so I recommend checking that out for all the detail.
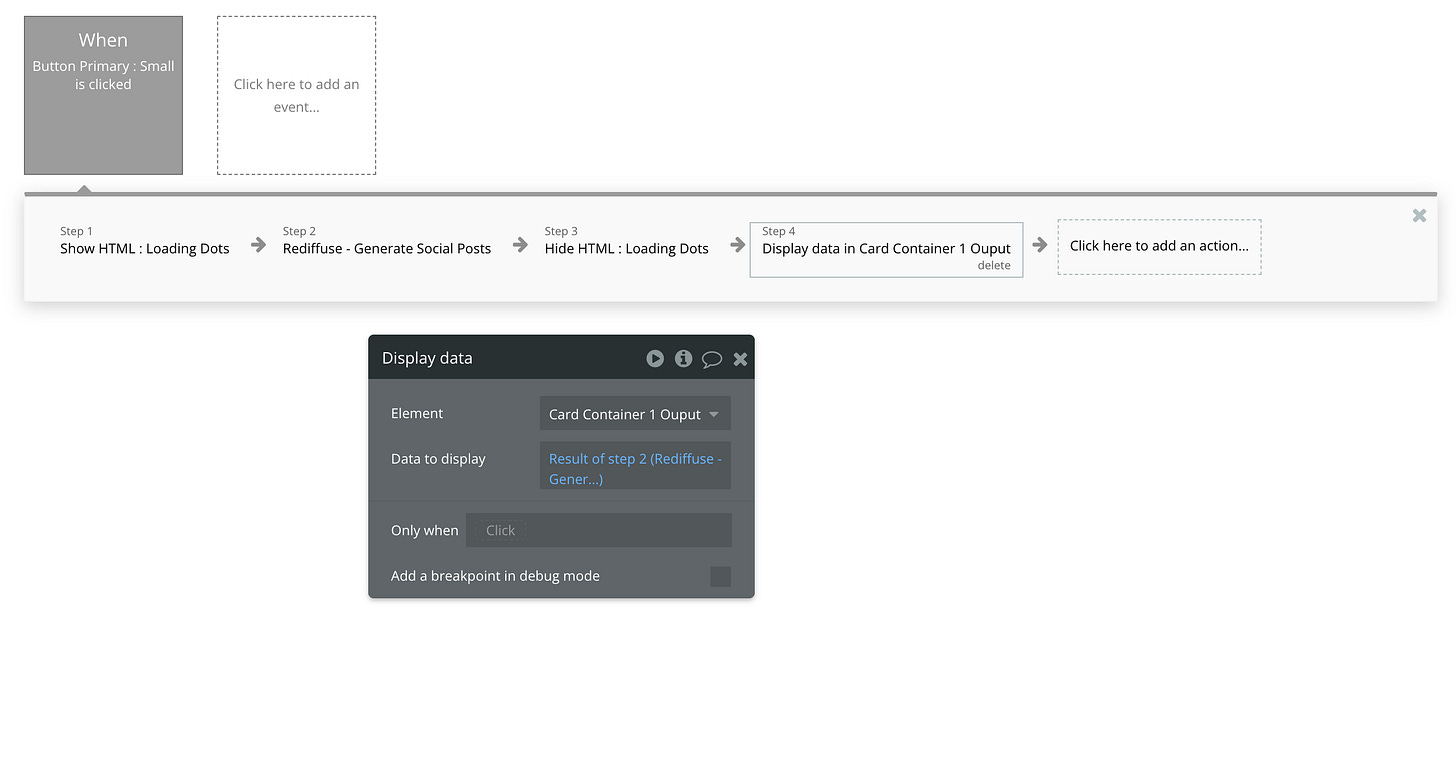
But essentially - when the run button is pressed we want to call our new backend workflow via the API connector. We pass through our site’s domain and the content for the article.
Then we want to take the data from the response and show it on the page.
We then show that output as the results, showing all the posts, hashtags and keywords.
You can start to understand how powerful this technique is and how it could power all sorts of actions in your app.
The best part is it doesn’t require any plugins, you can do it all through backend workflows and the API connector.
As I mentioned before, this technique powers some of the most powerful AI features in my own app - that customers love.
So it’s well worth considering how you could implement this into your own no-code SaaS - it’s likely to put you ahead of competitors and give you some unique features!
I hope you found this week’s issue and video helpful - let me know your feedback or questions, I love to hear from you. Just hit the reply button!
Until next time - happy building!
PS: Need help with building your own SaaS or AI integration? I take on a few freelance projects every year to help founders build their apps, and have a few slots open at the moment. If you’d like to learn more check out my freelance and consulting page, or just drop me a reply.
PPS: Don’t forget I’m organizing the UK’s first No Code Conference in London on Tuesday May 21st, NoCodeUK! It will be a day of learning from others who’ve built successful businesses using nocode. As a subscriber to my newsletter, you get an exclusive discount of 50% off. Simply head to NoCodeUK and use the code NOCODESAAS to get the deal. I can’t wait to meet you in person at the event!


Great read, thanks! I didn't know about the new response-format param from OpenAI.
Question: why did you choose to set up calling the API with the URL, vs using a Schedule API Workflow action? Just curious.
And related - I ran into issues when asking OpenAI to report a list of JSON objects. Since they are returned as one text variable, Bubble wasn't recognizing it as a list. I created a simple plugin to parse that list into JSON objects. Details here (https://forum.bubble.io/t/chatgpt-json-to-bubble-thing-converter/299985), happy to whitelist you for this if it would be helpful to you.