🏝 Using oAuth to add APIs to your NoCodeSaaS app - Issue #14
Happy Friday!
This week’s newsletter is all about implementing your own oAuth based API connections in your Bubble app.
Whilst there are many plugins available to help you to connect to other services, there are some big advantages in taking the time to build and maintain the connection yourself.
When using a Plug-in you’re limited to the API endpoints the original developer implemented. So if later you find you need to access another endpoint your only option is to either fork the plug-in (if it’s a free one) or to rebuild the connection.
With plugins you don’t have free access to the access token. For example when using the Google Authentication plugin, you can’t freely access the API Token which is generated during the authentication process, which allows you to make API calls server side or add new endpoints.
If the developer stops supporting the plugin, your app might break and you could have limited options to fix things. Building the API connection yourself lets you update when needed, add new endpoints and make whatever changes you need to.
These are just a few of the arguments for implementing your own API Connections, though there are many more.
At first I was very intimidated by oAuth API connections, but after implementing them a few times and picking up some of the fundamentals it’s well worth using them in your own application.
Let’s take a look at the example of implementing the Shopify API in an application. Though this issue is going to use Shopify, most oAuth connections use a similar pattern, I have set up the Slack app in the same way.
In this example I’m going to assume you have already created a new app in Shopify to generate an API Key. You will also need to add the url of the page in Bubble in Shopify to your allowed ‘oAuth Redirects’.
Step 1. Setting up your database to store tokens.
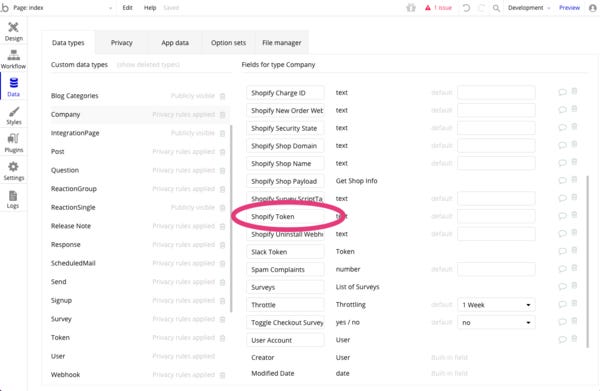
If we are going to be asking Shopify for a security token, we are going to need to store it somewhere. It’s best to start by creating a new field in your database structure where you will store the token.
Depending on your use case, you might be storing this against an individual user, or perhaps against a team or a company if your app allows multiple users.
Incidentally, this is another benefit of handling your own authentication - you can allow multiple users from the same team/company to use the same token.
This means if one user grants my app permission in Shopify, all other users of the system from that company will benefit and be able to query data from Shopify.
As you can see, in my app I am going to attach my ‘Shopify Token’ field to my ‘Company’ entity in the database. There is another field called ‘Shopify Security State’ which we will use to store a random string we use during the authentication process.
Note: Make sure you have your privacy rules set up in correctly in Bubble - you need to ensure any API tokens you are storing in your app are properly secured.
Adding new fields to your data structure to store tokens and security states.
Step 2. Initiating the oAuth Process.
To get started with implementing your oAuth API, let’s create a new page where you can test the authorisation flow.
We are going to need a few workflows and elements on this page to handle everything, we will cover each of these in turn.
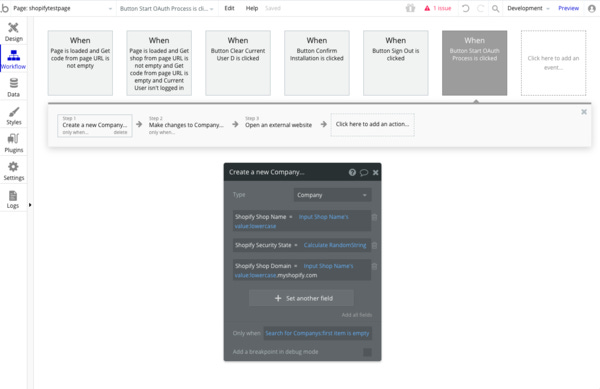
Here we are going to set up the workflow for what happens when a user presses the ‘Connect to Shopify’ button.
We need to provide Shopify with a few key data fields in order to make the call.
Shopify Store Name. This forms part of the URL we use to connect to Shopify, it’s going to be something like testfashionstore
Security State. This is a random string we will generate in Bubble and send to Shopify. We will store it in our database so we can check it when Shopify returns a response to us.
Shopify Shop Domain. This is the domain we will use during the API call, this url is based on the Shopify Store Name and adds .myshopify.com. So in our example, our url is going to look like testfashionstore.myshopify.com
Before making our call, we will store each of these fields to the database for the current user’s company. We will get the Shopify Store Name from a text entry field on the page where the user will have to type it in.
Start the auth workflow when user presses a button.
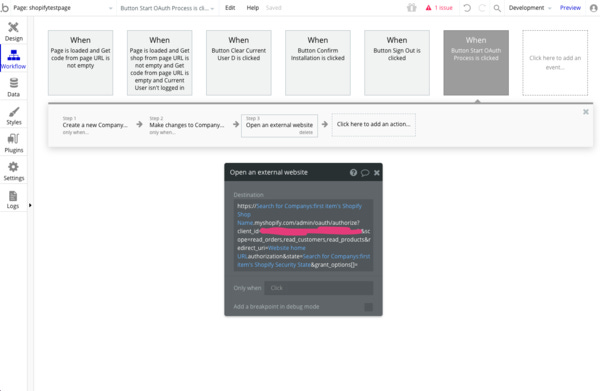
The next step is to ‘open an external website’ which will take the user to Shopify to complete the authorisation process and grant permissions.
As you can see, we are using the Shopify Store Domain at the start of the call. Here are all the parts of the url we need to inject….
Shopify Store Domain. The domain of the Shopify store we worked out from their store name.
Client ID. This is the client ID you get front your Shopify app developer dashboard.
Scope. This is the list of permissions you are asking the user for, you can find a full list of all the scopes in the Shopify developer documentation.
Redirect URL. This is the URL Shopify is going to send the user back to after they have completed authorisation, we want this to be the current page in our Bubble app.
Authorisation State. This is the unique string we generated earlier in this workflow.
Send the user to Shopify to authorise, injecting key data into the URL
Step 3. What to do when the User is returned from the authorisation flow.
When the user comes back from Shopify, a ‘code’ is going to be provided in the URL as a parameter. We need to use a workflow to pick up that code and exchange it for a token we can use to make API calls.
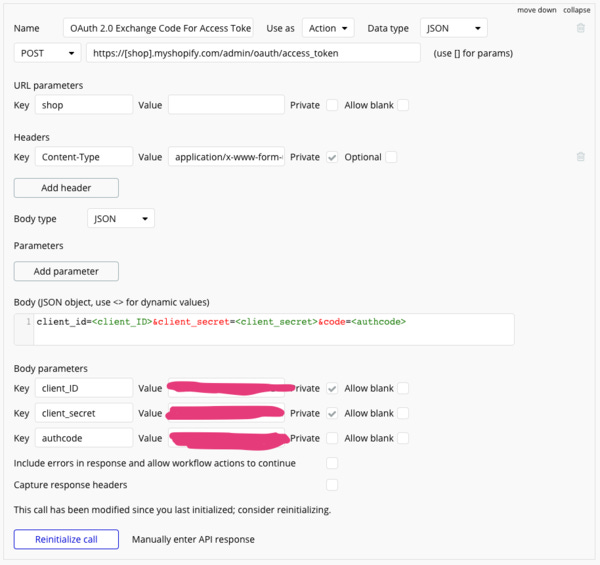
To do this exchange, we need to go and set up a new API call in the Bubble API Connnector plugin.
This API Call is to exchange the code we got in the URL parameter for a access token.
You can see the setup for this below.
As you can see, we are going to use the fields we stored to our database earlier to make this call as well.
Add a new API call to the API Connector to exchange your code for a token.
Once we have this set up in the API connector, we need to build the workflow on our Bubble page which is going to make the API call and store the token we get back to our database so we can use it whenever we like in future.
Create a new workflow with the condition ‘when page is loaded and get ‘code’ from URL is not empty’
This means this workflow is only going to run when the user has been returned from Shopify after completing the authorization process and has an auth code.
When the current page URL contains ‘code’ run this workflow
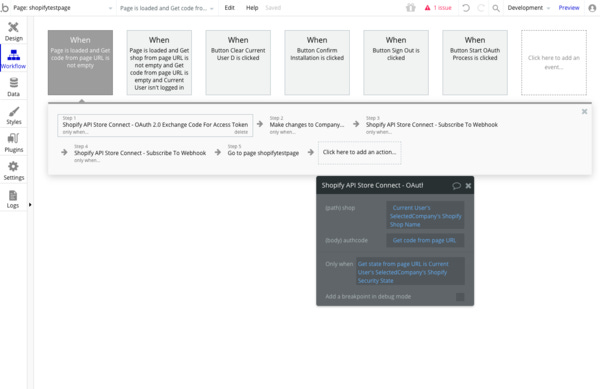
The first step we need to run is to exchange that code for a token using our new Shopify API endpoint we set up earlier.
We need to provide it with the Shopify Shop Name & the random string auth code we have saved to our database.
When this API call runs, Shopify should respond with an access token we can store to the database.
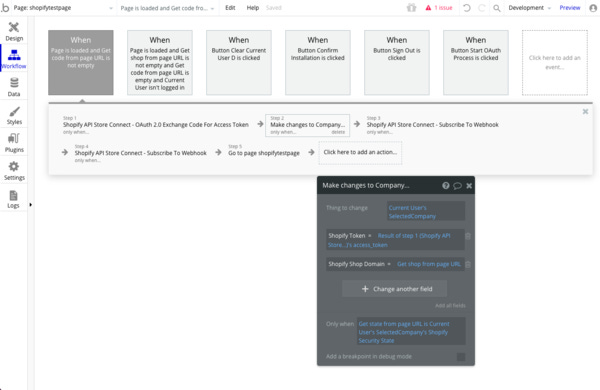
When Shopify responds with a token, we store it to the database.
As you can see we then ‘make a change to the current user’s company’ to store that token to the database.
You can ignore the next 2 steps, these are specific to my application where I subscribe to some Shopify Webhooks using the token.
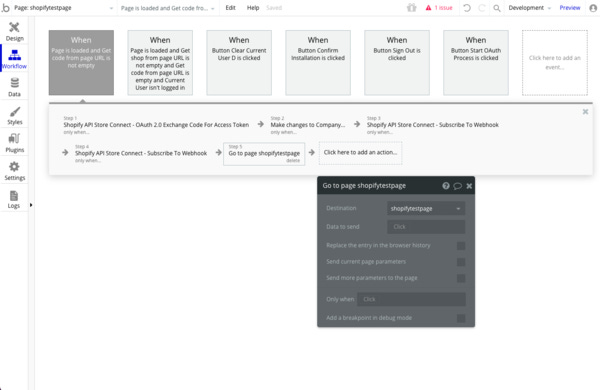
The final step is to clear the ‘code’ from the current page URL by using the ‘Go to page’ option and navigating to the current page without any URL parameters.
When you have a token, clear the ‘code’ front the current page URL
This means we now have a access token stored to our database which we can use to make any. API call we like to Shopify at any time, even using backend workflows.
This means our app can query Shopify for data even when the user is not logged in.
That’s it for this week!
Hope you found this issue helpful, getting to grips with oAuth and APIs is one of the biggest ‘power ups’ you can have for working with Bubble so I do encourage you to take some time to experiment and get it working.
NoCodeSaaS on tour in Santorini
I’m writing this issue from the side of the pool in Santorini on a iPad mini (formatting is a bit tricky!) so I hope everything was formatted ok and made sense.
Until next week, have a great weekend and happy building.
James.


