👩🎨 Organising your #NoCode app for maintainability & speed - Issue #9
Hey there!
It was a pretty big week for anyone building a SaaS business using Bubble.
Bubble have been largely bootstrapped since they were founded in 2012, except for a $6.3m raise in 2019.
But - this week brought the news that they have raised a whopping $100m to build out the Bubble platform.
That means we’re going to be seeing tons more improvements to the product in the future.
This is an absolutely amazing time to be building on Bubble - things are about to get a lot better and you are still getting in on the ground floor.
If you’re worried about Google or some other tech giant eventually acquiring and shutting down Bubble - take a look at this document.
It contains this guarantee…
While we plan on being around for a long time, we’ve committed publicly to release our code in open source with migration instructions if we ever were to shut down shop and cease offering our service.
As I’m building a SaaS business on the platform myself this guarantee was very important to me - it gives some level of confidence and I trust the founding team to honor it.
On to this week’s topic!
Why is it worth spending time to organise your Bubble app properly?
If you’re building a SaaS app on a nocode platform like Bubble, it’s highly likely your app structure is going to get fairly complex.
Whether it’s workflows, page logic or database triggers - if you don’t have a plan to organise them you could quickly end up with an app which is a nightmare to update and maintain.
There are a few things it’s worth taking the time to do to structure your app so that it’s easy to update and maintain.
If you ever plan to sell your business - it’s going to be absolutely critical it’s well structured and easy to hand over.
Last year, I sold an app I built on Bubble using Microacquire. If I hadn’t taken the time to structure it properly and document everything, it would have been impossible to hand it off to someone else to run it.
Taking the time to properly organise your app also makes it easier for you to bring help from other nocode developers if you need help with some specific features.
Reusable Elements
As we covered in the 2nd issue of NoCodeSaas - using a single page app design style can make your app much faster.
This approach relies heavily on reusable elements.
If you’re not using reusable elements everywhere in your app you really are missing out.
There is one obvious benefit of Reusable Elements - by using them you don’t need to rebuild and maintain the same element on different pages in your app.
They are also an amazing way to make designing and maintaining your app much easier.
For example, I use them for quite a few different things.
UserLoop's reusable elements. Use Emojis to help you keep track of each type!
Every page of my app is it’s own reusable element. This means even though my app is a single page design, all the logic for each page is in it’s own reusable element. If I wasn’t using reusable elements I would have an unmanageable amount of workflows and my app would be really slow.
All my popups are reusable elements. The same applies with popups. If your popups contain their own logic and workflows, this can quickly overload your page and make it harder to manage. Converting your popups to reusable elements gives them their own page for workflows. It also means you can instantly drop them onto any page in your app if you need them.
Elements like my billing controls are reusable elements. This means I only have to build all my billing logic once and I can then drop it wherever I want in my app without having to rebuild it - on a page, in a popup, wherever I like.
External HTML / JS Snippets are in reusable elements. I use tools like Intercom, Fullstory and Google Analytics in my app. By using reusable elements I can quickly drop them on to the pages I want them to be active. This means I don’t need to have them installed on every page of my app and can choose where they’re active.
Features like newsfeeds work well as reusable elements. My app contains a newsfeed of a user’s most recent customer feedback. It needs quite a bit of logic to work properly and having it as a reusable element means I can drop it wherever I like.
It’s worth noting you can place reusable elements inside each other and it works fine, this is great for single page apps like mine as they are effectively nested reusable elements!
Backend Workflows
Backend workflows are probably the most important feature in making your app easy to maintain and scale.
Here’s a look at all my backend workflows (don’t worry I’ll show the organised view later! 😜)
Use Backend Workflows For AS MUCH AS YOU CAN!
My simple rule is…. when adding new logic to your app, make it a backend workflow wherever possible.
This not only speeds up your app’s UI, it also means you only have one workflow to maintain if you want the same function on multiple pages.
Copying and pasting workflows between different pages is very quickly going to become a nightmare once you need to change something.
If you use backend workflows, you only need to make the change once. Every page on your app will be referencing the same workflow, so you don’t need to go round updating loads of them.
You might notice I’m using all the different types of backend workflow above…
API Workflows. These are the most common and you call the them directly from anywhere in your app. They can also accept inbound commands from outside your app using webhooks.
Database Triggers. These are a super powerful to trigger a workflow whenever data changes somwhere in your app, you will often use these to trigger a normal API Workflow. You can configure them to listen for changes in your data in tons of ways.
Recurring Event. These are workflows which run on a schedule you control. If you want a workflow to run every day at a certain time this is how you do it. They are also almost always used when linked to trigger a regular API workflow.
Given the flexibility, you should be able to move almost all your app’s logic to the backend.
Any workflows in your frontend should be primarily focussed on navigation, updating your UI or triggering a backend workflow.
Make sure you give your backend workflows sensible names - this can be really helpful when you’re searching through logs trying to fix something.
Folders & Color Labels
If you’re using Backend Workflows for everything, you want to keep everything organised in a logical way.
When you’re looking for a specific workflow, it makes sense to organise them in a logical way for your app.
Backend Workflows are much easier to manage when you use folders.
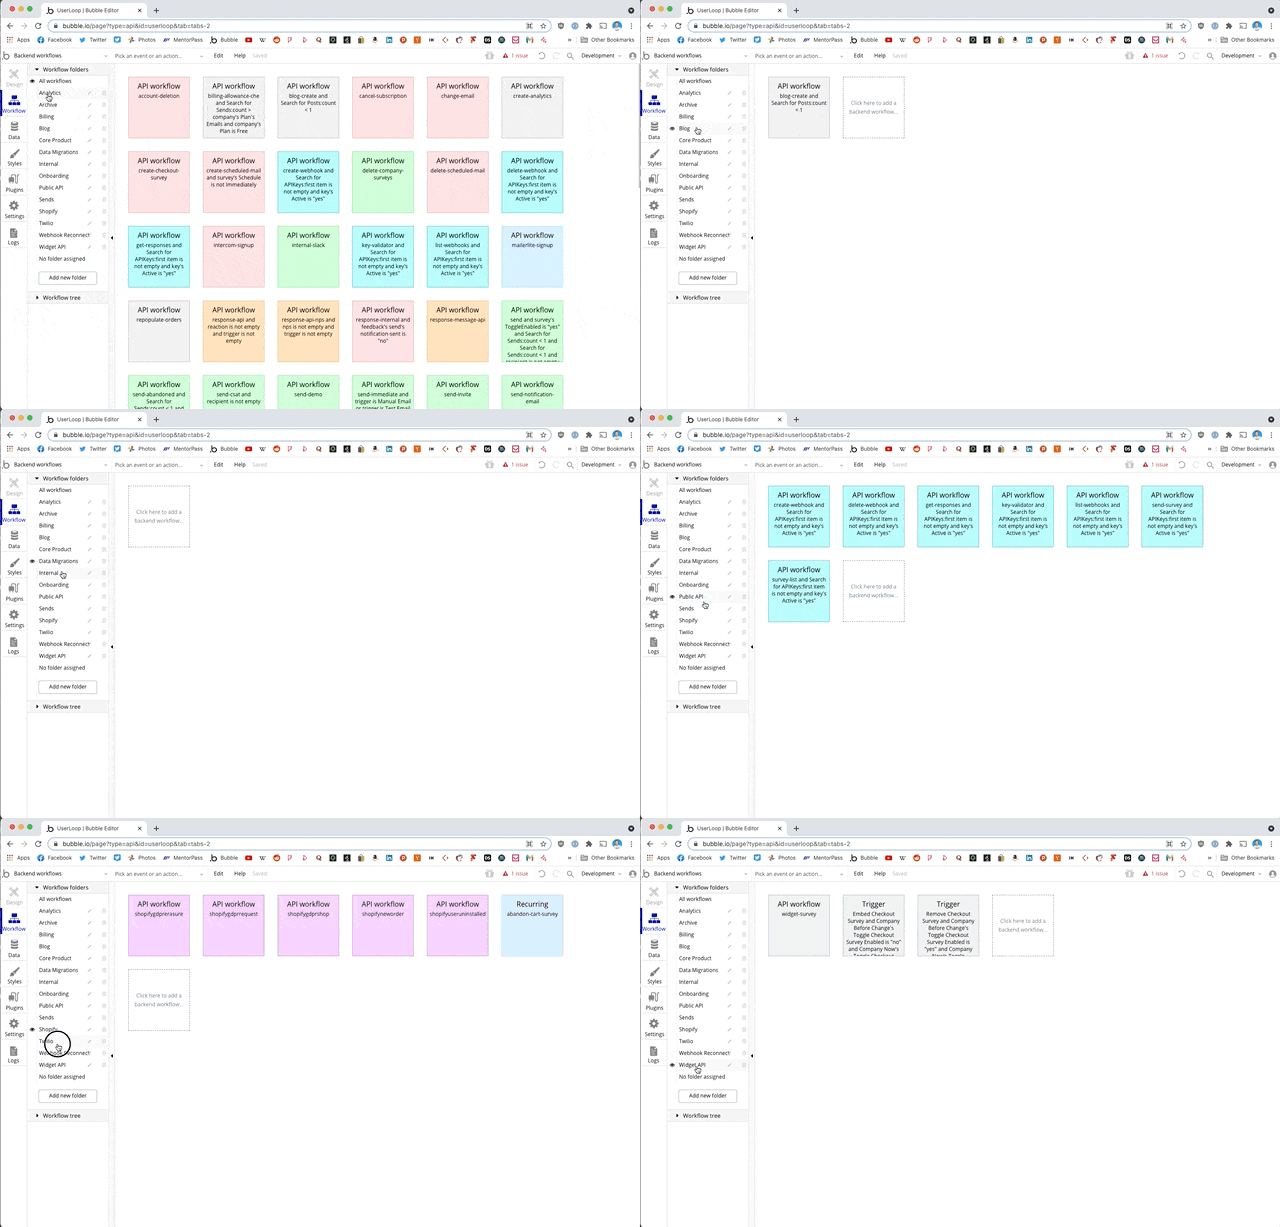
As you can see, for my app I’ve created a ton of folders related to the key functions of my app.
Analytics
Biling
Core Product
Data Migrations
Internal
Onboarding Public API
Sends
Shopify
Twilio
Webhooks
Widget API
Inside each folder are all the backend workflows related to that thing, it really pays off to come up with a structure like this for your app and to put your workflows in folders.
I also recommend using the coloring feature to give your workflows colors to group them together and make them easier to organise.
You might notice I have a folder for ‘Data Migrations’.
It’s highly likely as you build out your app you are going to need to use one off workflows to make changes to your data after you add new features. I recommend putting all those workflows in a folder like this so you can delete them when they’re no longer required.
You don’t want tons of outdated workflows clogging up your app and potentially making it insecure.
Using the App Optimizer
Tidy your app using the App Organiser
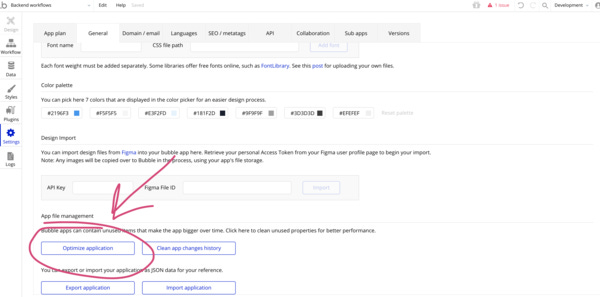
You might have noticed a feature in the Bubble Settings called ‘Optimize Application’.
This is a handy feature which searches through your app for unused elements, data types, images, plugins etc etc\
It’s worth using these every few months to remove things you’re no longer using from your app.
Caution: I recommend creating a manual save point before touching this feature, and to always manually select the things you’re deleting. Sometimes you might have styles or data types you’re not using right now but don’t want to delete from your app so its best to select the things you want to delete manually.
That’s it for this week!
Thanks to everyone for all the lovely replies to last week’s email, I really enjoy hearing from you - and helping out with your Bubble app questions where I can!
If you get a moment it would be amazing if you could share this newsletter on Twitter or LinkedIn… the more we can spread the word about the power of #nocode the better!
People can subscribe easily at https://NoCodeSaaS.app
See you next time 😁


