👋 Onboarding and supporting users in your no-code app - Issue #18
Designing a great onboarding experience
Giving your users a great onboarding experience when they sign up to your application is one of the most important aspects of building a profitable SaaS app.
You’ve likely just spent a huge amount of time, effort and money acquiring a user, so when they sign up it’s important to get it right.
A good onboarding process means users are more likely to get the most out of your app, and that they’ll sign up to a paid plan.
I’m going to share a few strategies I’ve used to improve my app’s onboarding experience.
Structuring your onboarding UI
There are a few ways of building your app’s onboarding flow in Bubble…
Create a dedicated page to direct users to for onboarding. Users only visit this page during the signup process and it’s hosted on its own URL.
Create a pop-up modal which triggers when a user has not completed onboarding, depending on your preference you could make this mandatory by not allowing it to be closed until the user completes onboarding.
Use hidden groups in your app’s UI which only appear when a user has not yet completed onboarding and provide key instructions on how to get started
In my application, I combine popups and hidden groups to collect key information and give instructions on how to get started.
Here’s an example of using a hidden group to help with user onboarding.
This group is shown on my app’s homepage at the top of the user’s newsfeed when their record in the database is marked as having not yet completed onboarding.
Simple onboarding instructions to help users customize their app experience
As you can see this directs the user to set up a few key things about their account which we know will mean they are more likely to be succesful.
To control this group being shown at the right time…
Group is set to not be visible on page load
When users has not completed onboarding the group is set to be visible
It’s important to make sure you’ve checked the box to ‘Collapse this element’s height when hidden’ to make sure it doesn’t interrupt your app’s UI when it isn’t visible
Here’s what the rules to make it show look like…
Conditional logic to make the onboarding group show
Understanding the user
Depending on your app’s signup process, you may be asking as little as possible on your signup page to optimise conversion.
If you’re letting users signup with just an email address you’re probably going to need to ask for more information in your onboarding.
It’s really good idea to ask a simple question in your onboarding along the lines of ‘What is your goal?’ listing a few common use cases of your app. This is really helpful in getitng insight into what people are expecting to get out of your application. You could store these as ‘Option Sets’ against each user.
I recommend having a simple field in your app’s database against each user/company which signals whether onboarding has been completed yet.
If you’re keeping things simple, this could be a simple boolean yes/no. But if you want to get more advanced you can store which step of the process the user has made it to using a number. (0=not started, 5=completed for example).
If you’re using a full-screen modal, here are some ideas on how you can structure it to appear like a wizard.
Here - I have a reusable element for a popup that contains 3 steps to collect user information.
In each step, I collect the user’s full name, email address, company name and then ask them to enable a key feature.
Onboarding modal using 3 hidden groups which act like steps
Each group in this modal is ‘not visible’ by default.
They are made visible by simple workflows on each button which hide the previous group and show the next one, storing any data to the database along the way as required.
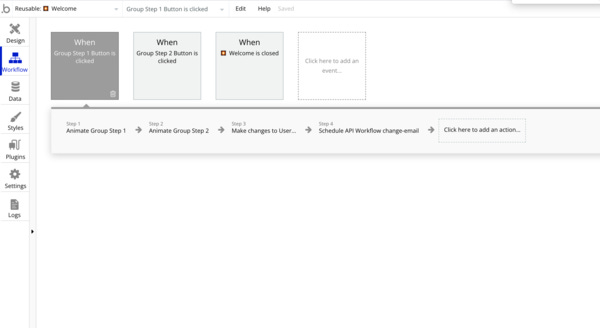
Here’s an example of a workflow which is fired when the user presses the first ‘next’ button on the modal.
Showing and hiding groups in the onboarding modal
As you can see there are a few actions happening here.,
Animate Group Step 1. We want to fade out the first group in the onboarding to hide that step.
Animate Group Step 2. We want to animate this group by fading it in so it’s visible.
Make changes to user. In the background, we run a workflow to store the data about the user to the database. When this step is running the user will already be on the next step of onboarding, so they don’t need to wait for Bubble to finish any database operations
Trigger API Workflow. I also trigger a server-side API workflow to update another field.
All of this means the onboarding experience is super smooth and fast, and data is stored at each step - meaning if the user doesn’t complete the onboarding we still have the data they entered so far.
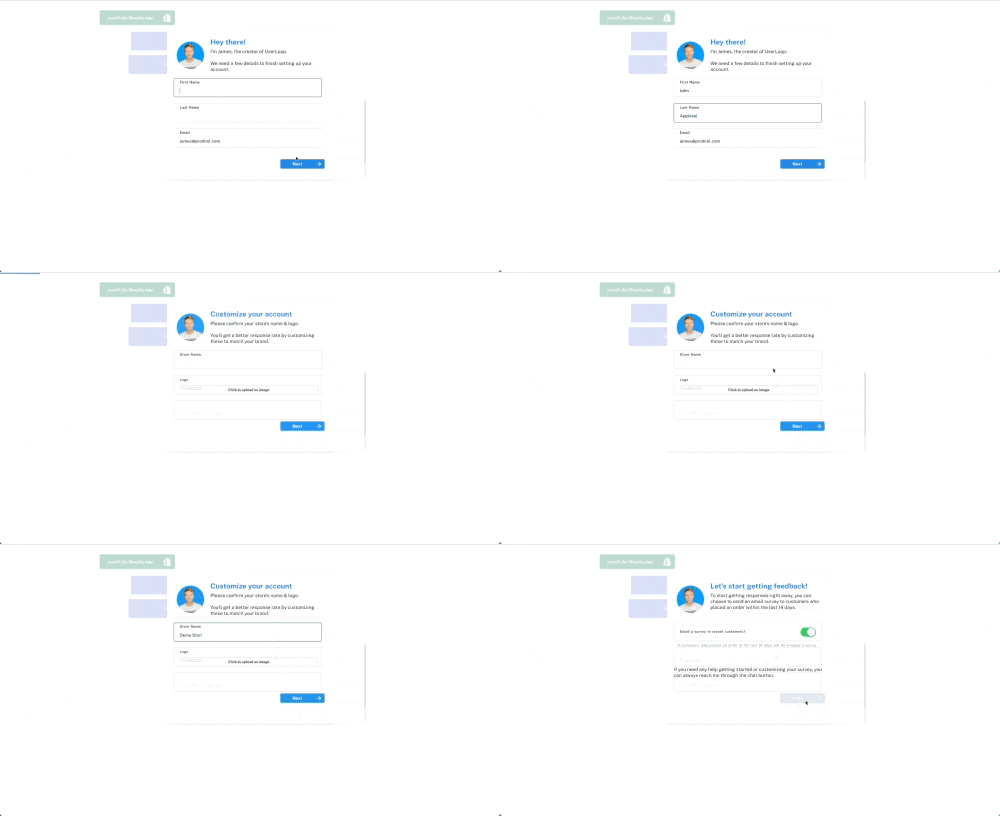
Here’s what it looks like when it runs…
Smooth onboarding with data being saved in the background
User Support
If you’re building a SaaS - you’re probably going to want to offer your users great support.
There are a ton of tools which help you do this well with Bubble.
I’ve tried several of them - Intercom, Drift and Crisp.
Intercom is fantastic - it’s also super expensive and might be overkill if you’re just getting started.
I recently switched from Intercom to Crisp and have been super impressed. It’s also massively more affordable than Intercom with a similar (if not even better!) feature set.
Here are a few things you can do in Bubble with a tool like Crisp.
Offer real-time chat and support from an in-app chat bubble
Trigger onboarding drip email campaigns based on what the user does.
See a live screen share of the user’s actions while chatting to them to see what the problem is
Update users about new features
Thankfully, these tools are easy to install with Bubble - and easy to integrate with your app’s data.
Here’s an example of how I have Crisp set up with my app.
Firstly, I have a reusable element that contains the core HTML which Crisp needs to run.
I then drop this reusable element onto every page where I want to Crisp to be active. This is handy because you might not want to use it on every single page of your app.
You get your personalised Crisp embed code as part of the signup process.
Use a reusable element containing the Crisp HTML snippet
If you just wanted a basic installation, you could just stop here.
But in my example, we want to send Crisp some data about the current user.
To do this we will need to install the Toolbox Bubble plugin which lets us run custom Javascript.
Once that plugin is installed, head back to the workflows tab on your reusable element.
We want to trigger an action on page load which is going to send a javascript payload to crisp with the current user’s data.
As you can see, we are using the plugin’s ‘run javascript’ action when the page is loaded.
The code we are running is sending our current user’s email, company name and first/last names to Crisp.
Here are the code examples in the Crisp documentaiton you will need to copy and paste.
This will store all this data next to the user’s record in Crisp. This is really useful for triggering things like automated chats, emails and other rules.
When you start adding all this data, you get a really well-populated user profile in Crisp which really helps when you’re trying to give user support.
What a Crisp user profile looks like populated with data from Bubble
That’s it for this week!
Hope you found this issue helpful! Do you have any other topics you’d like me to cover? Drop me a reply!
If you’ve found any of my newsletters helpful, I’d really appreciate some feedback.
Have a great weekend - and happy building!
James.


