

🔀 New Bubble responsive engine & how to manage data migrations in your app- Issue #20

Hello there!
Hope you’re having a great week.
This is my first issue in a few weeks, as you may have noticed - Bubble finally released their long-awaited new responsive engine, so I’ve been pretty busy!
I’ve been spending time updating my own complex Bubble app piece by piece to the new engine, and the initial results are very promising.
It does take a while to get the hang of, but once you get used to it you can build much more pixel-perfect designs in a logical way - and as a bonus they load and render much faster too!
This webinar by Zubair is a great intro to the new engine, with some real working examples of how to build with the new engine. Watch here on YouTube.
As the new responsive engine is based on Flexbox, it also makes sense to watch some tutorials on that, here is a good one.
As the engine is still in Beta, there are still a few quirks (such as not being able to set padding) but these will all be resolved before the first full version.
So far, I have only pushed my most simple pages to production using the new engine. More complex pages and single-page app designs might be worth holding out a little longer until the new engine exits beta.
I’m going to be covering the new responsive engine in detail in the coming issues, so do let me know if there are any particular topics or examples you’d like to see.
On to this week’s main topic…
Migrating data in your Bubble App
As I’ve said in previous issues, it makes send to spend a lot of time planning your data structure at the beginning of your project.
Fully understanding all your entities, and how they relate to one another is crucial to a successful build on Bubble - and can save hours of nightmares trying to fix things.
However, even if you spend all the time in the world planning your data structure - things change and sometimes you need to change the way your database is structured after your app has been released.
This has happened to me a few times recently. I’ve had to make some changes to where certain things are stored in my database.
And with over 100 active users and 30k+ responses collected in my database, I really try to avoid changing my data structure unless I can help it.
Thankfully, there are a few strategies you can use to migrate data from one type to another or to totally change your app’s data structure if you need to.
First thing’s first.
I really recommend having an admin page of your app where you can run these kind of jobs in production. The page should be secured so that not just any kind of user can access it.
In my app, every user has a yes/no field for ‘SysAdmin’.
So I set my own user’s ‘SysAdmin’ value to yes.
Then I can use it throughout my app to be able to access certain pages using a workflow rule. Example below.

Secure an admin page by redirecting users who don't have access.
Now we have our secure page built, we can start creating our backend workflows to manage our data migrations.
In my example, I’m going to run a data migration to go move a preference setting from one database object to another.
Currently, I store a user’s notification preferences against my database’s ‘Survey’ object.
However I now want to move that preference to be stored on the user object directly.
To manage moving the existing user preference from one object to another, I am going to create a backend workflow and run it from my newly secured admin page in production.
I recommend creating a backend workflow folder for your data migrations to keep them organised.
Often, once you’ve finished a migration you’ll want to delete the workflow so it makes sense to keep them all tidy in a folder, here’s mine.

Keep your data migration workflows organised in a folder
So let’s start working on our workflow to move this preference data.

Create a backend workflow API workflow to change your live data
To start, I’m going to create a new API workflow.
Make sure you don’t expose this as a public workflow by unchecking the box, this only needs to be able to be run by your ‘SysAdmin’ user.
Sometimes, I also check the ‘ignore privacy rules’ checkbox depending on the job.
It’s worth setting up your privacy rules to allow your ‘SysAdmin’ users to do pretty much any task in your app to avoid having to do this.
Then I’m going to add my keys to this API workflow.
In this example, the only data entity I need is ‘Company’ so I am just going to add that.
Then we can start work on the workflow to update the data for each company.
(I should note, I’ve already created a new field on my User object to accept the data I’m going to be moving from the Survey object)
As you can see, I then have a workflow with a few steps.
For Step 1, I want to set the email toggle on the user to No if its already set to No on their survey preferences…
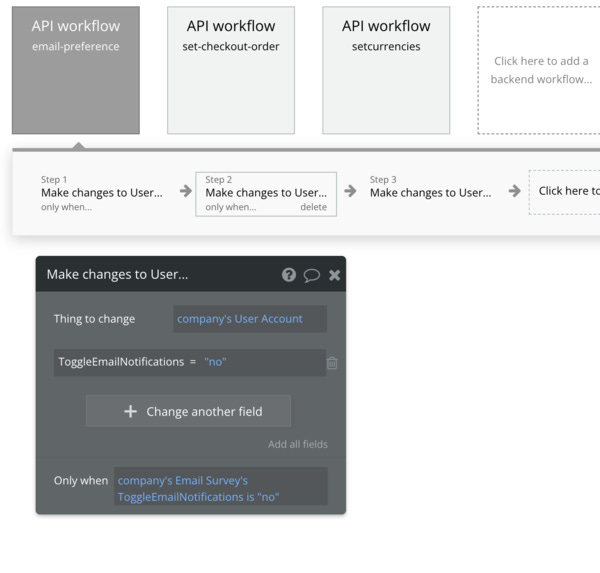
And if a user had their email preferences set to Yes I want to set my new setting to Yes as well.
As you can see, I’m using the ‘Only when’ operator to make these changes.
So the new value is only set when the old value equals the same thing.
Here’s the example for Yes…

Then at the end of the workflow, I also set some values for some other new fields I’ve added.

Set field values for existing users
When I set these fields up in my database I did give them default values, but these are only applied for new entries created going forward, meaning values would be blank for my existing users.
That’s the reason we have to run these backend workflow migrations, to update existing records.

When creating new fields you can set a default value, but these arent applied retrospectively
So now we have our backend workflow all set up and ready to go, we need to trigger it.
To do this I’m going to go to my admin page and create a button which will trigger this backend workflow.

Create a button on your admin page to trigger the backend workflow.
So above you can see we have a button called ‘Set Email Prefs’ on our admin page.
When the user clicks on that, we want to ‘Schedule a API workflow on a list of things’.
In my example, the list of things is all the companies in my database, so I find those with a search.
You might want to refine this search down by only running this workflow when a specific field is blank - this gives you some protection against accidentally running it twice.
Test your migration first!
With data migrations, you only really get one chance to do it properly, so I really recommend running it on your dev environment first to check the results are exactly what you expected.
You can use the ‘Scheduler’ tab in Logs to see the list of migrations, and the Server Logs tab to see exactly what’s happening.
You should also check your app data before and after the migration to make sure everything changes as you expected.
Once you’re ready to go, you can push your changes to production and run your migration there.
Hopefully, everything goes smoothly and you’re good to go, you can then delete your migration backend workflow and redundant fields and move on.
If something hasn’t worked as expected, you can always roll your database back using the ‘Copy and restore database’ from the App Data tab, but I would really try and avoid this as things can get confusing.
Spend a lot of time testing your migration so it works perfectly the first time!
You can of course use this technique to make pretty much any kind of data change you can imagine to restructure your database - just be careful 😉
That's it for this week!
Thanks so much for subscribing, I hope you found this issue helpful!
Here are a few of the upcoming topics I’m planning to cover in the following weeks…
Using a screenshot API in your apps, how to build your own mini wayback machine clone
Adding advanced lists of things to your transactional emails. Great for styling things like receipts or weekly updated
Building a custom Zapier integration for your app
Integrating a help centre deeply into your app to show users how to do things
Let me know if there are any other topics you’d like to see me cover!
Meanwhile, happy building and have a great weekend.
James 😄