💻 Mastering the API Connector to supercharge your NoCode SaaS app - Issue #8
Happy Friday!
This week I’m going to cover one of the most powerful features in Bubble - the API Connector.
The API Connector is an official plugin which is deeply integrated with Bubble and allows you to intertact with other internet services using API calls.
You can achieve some quite amazing things using the API connector in Bubble.
Here are a few examples of things you can do…
Render a video using Shotstack. Simply send an API request with the details of the video you would like to have generated and Shotstack will respond with a fully rendered video.
Pull Order, Customer and Product data from Shopify. This is a key feature of my app - having to ability to pull almost any data you could ever want from Shopify lets you build poweful apps for ecommerce sellers.
Integrate with Google Cloud Natural Language AI. I’ve used this amazing API to analyze blocks of text, to extract keywords, sentiment and insights.
These are just a small sample of some of the amazing things you can do - the limit really is your imagination. My app UserLoop is also integrated with Postmark for email, Ghost for rendering blog posts, Intercom for customer service, Mailerlite for marketing email and Brandfetch for automatic logo population.
If you’re planning to use third party APIs extensively in your application, it’s worth familiarising yoruself with Postman.
Postman is a fantastic desktop and browser app which you can use to test API calls.
I highly recommend using it to test and validate APIs before you set them up in the Bubble API connector - it saves you tons of time by making sure the call is working properly (your endpoints, auth, formatting etc is all correct) before you import it into Bubble.
Avoid plugins for connecting to third party API Services.
Bubble’s plugin store contains tons of apps which let you connect to third party APIs - however I would recommend being cautious using these.
If the plugin ends up being disconinuted or not updated, you could end up with parts of your app breaking and having to go through a painful rebuild.
It’s really worth using the API Connector directly for any services you want to integrate with - it’s not super hard to set up and puts you in full control.
If you want to add new endpoints its a 30 second job, you’re not relying on a plugin developer to do it for you!
Importing API Calls to the API Connector
One amazing hack for adding API calls to the API connector super quick is to use the Bubble API call import function.
In this example, we’re going to import a API Call for rendering a video using Shotstack.
To start, I’m going to go into the API Connector and press the Add Another API button to create a new API connection.
I’m going to have the Shotstack API documentaion open in one window to do my test. We’re going to use the Render Video endpoint to generate a demo video.
In most API Documentation sites, you’ll be given example API calls on a right hand pane.
We’re looking for the cURL example.
Bubble has a neat feature where we can copy the cURL example and import it into Bubble as a working API Connection.
Copy the cURL example of the API Call you want to imoprt.
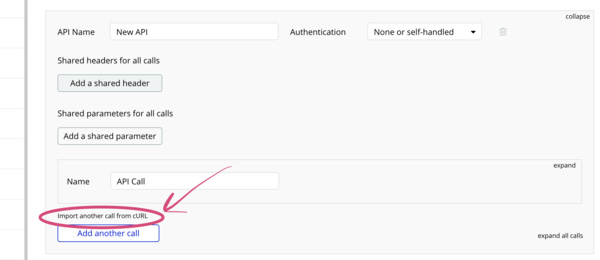
Once you’ve copied your example call, head back over to Bubble and look for the ‘Import another call from cURL’ button.
Look for the 'Import another call from cURL' button.
When you click that, you’ll be given a prompt to paste in your example call.
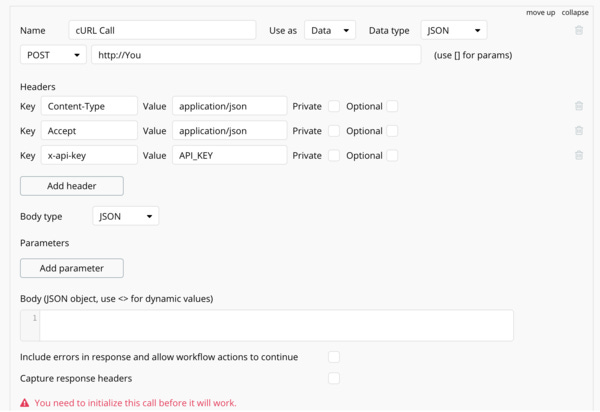
When you press the Import button, Bubble will import and set up the call for you, all you have to do then is paste in your API key.
Update your API Key and copy over the body from the example.
To finish setting up your call, paste in the body JSON from the example in the Shotstack documentation and press ‘Initialise’ to set up the call.
Shotstack will then start rendering your requested video and provide a response with information on how to get your video.
You just generated a video using no code from Bubble - how cool is that!
You can then customize your call to generate any kind of video you like.
This principle works for just about any API call and helps you get set up and integrated into your app in no time.
There are some other great new features of the API connector which I’m going to quickly cover now.
Error handling and management.
If you’re dealing with third party APIs in your app, its inevitable that sometimes those calls are going to result in errors.
Thankfully, Bubble have recently added great support for this natively in the API connector.
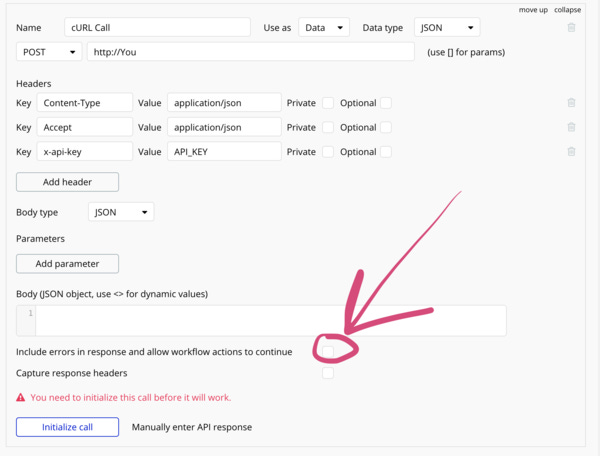
To use this feature, you need to ensure you’ve checked the ‘Include errors in response and allow workflow actions to continue’ option.
Make sure you enable this to benefit from error handling.
Once this is turned on, you will need to reinitalise your call to get the new fields to show up.
Once it’s set up you get a few new options in the editor…
Error Status Code
Error Status Message
Error Body
Returned an Error (Yes/No)
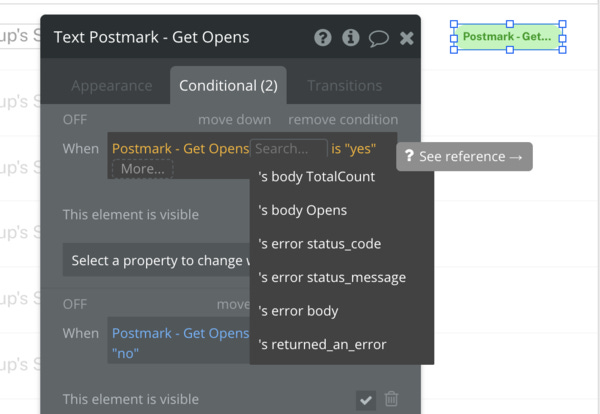
All the options you get when API Error Logging Is Enabled.
In this example, I have an element in my UI which is doing a call to Postmark to get the number of times a specific email was opened.
Using the new API Error Handling I’ve added a contion to hide this count should the error fail.
To do this, I use the ‘returned an error’ option. When it’s set to ‘yes’ I set the element to be invisible.
This means should the API call fail, users don’t see an ugly or broken element on the page, it’s just totally hidden.
You can use this logic elsewhere such as in your app’s backend workflows.
Bubble also just added another great new feature which can come in handy when you’re sending data from your app to an API service.
When sending text or other kinds of data from your app to an API it will need to be formatted correctly for JSON. This means certain characters need to be escaped - like a comma (,) as these can cause your API calls to fail.
Until recently I had to do this using Bubble’s ‘Find and Replace’ option, replacing a comma for a json friendly version.
Thankfully - Bubble have added a new formatting operator which will automatically format your data to be JSON safe - allowing you be confident any data your app sends to other APIs is going to be formatted correctly.
As you can see in the example below, all we have to do to format our text to be JSPN safe is select the appropriate formatting option…
Select :formatted as JSON-safe
Thanks for reading!
I wanted to include an awesome example of a startup using Bubble & nocode to build a prototype of a product to raise funding.
Packfleet is a new delivery service started by several of the core team of UK banking unicorn Monzo.
Founder Tristan Thomas built the platform’s first prototype using Bubble, integrating to the Shopify API to pull order data.
Based on that Bubble MVP they were able to close a £1m pre-seed funding round.
It’s great to see founders be able to ship and interate a MVP so quickly which is good enough to help validate an idea and raise significant investment.
Good luck to Tristan and the Packfleet team on their launch and scale!
So exciting to see @trstnthms & other ex-monzo employees launch @packfleet with a £1m pre-seed round.
The first Packfleet MVP was built with #nocode in Bubble.
If you need any more proof that 'no code' is powerful + here to stay - here it is! 🚀 https://t.co/jOolM3umKU
Thanks for reading, drop me a line if there’s anything you’d like to see covered in the coming weeks. Perhaps a specific API you’d like to see covered, how to test your nocode app or even how to get an exit and sell it on a marketplace. Just hit reply :)
James 🙌


