

How to make your Bubble content rank on Google by integrating Ghost

Hey there!
Welcome to this week’s NoCode SaaS newsletter, where I take you along on the ride of building a profitable SaaS business without code using AI and Bubble.
This week I wanted to take a look at a topic which is often discussed - how to get your content ranking highly on Bubble and optimising your SEO.
I’m going to touch on a few of the basics of getting Bubble optimised for SEO as well as another technique I use for running my own blog on the UserLoop site using Ghost as a backend.
Deciding whether to use Bubble for your blog.
If you’re early on in your project it’s worth spending a bit of time thinking through how you’re going to host your app and marketing content.
This is one of those decisions which can be a bit tricky to unpack later so it’s worth spending some time to get it right at the start.
When I launched UserLoop (which started out as a weekend side project) I decided to host both the app and the marketing site on the same Bubble app on the same domain.
While this does have some benefits like being able to build a slick integrated signup flow there’s also a bunch of tradeoffs.
For example, if you want to run a blog and attract traffic from search you’ll need to think how to host your blog.
It’s not really an option to host your blog content on a subdomain like blog.yourdomain.com, I tried this in the early days and it didn’t rank in Google at all.
It’s super important that however you decide to host your marketing content that is lives on the root domain of your app.
As such, now looking back it would have been much better to host the UserLoop app on a subdomain like app.userloop.io, that would have given me the choice to use whatever I wanted to run the marketing site.
However, I’ve managed to make everything work with having everything on the root domain and rank well for my key target search terms.
In this issue I’m going to cover 2 of the main things I learned from optimising Bubble for SEO and getting it to rank highly.
The basics of configuring Bubble to be indexable by search engines
How to use Ghost to serve as the backend for your blog and serve content via Bubble
By following a few simple steps you can easily get your Bubble based pages to start ranking in Google.
Bubble Basic SEO: Getting Started with Search-Friendly Pages
Let’s dig into making your Bubble content actually show up on Google.
It’s defiantly possible to rank well with Bubble based content despite what you might think. Even though Bubble’s page speed load times arent the best, if you follow some simple basics you can still rank well. (I believe Bubble are also still working on improving page load speeds further by pre-rendering content server side)
So let’s get into some of the basics…
1. Sort Out Your Page Titles and Meta Descriptions
You’ve got to tell Google what your blog post is about, and Bubble makes it pretty simple. Open up the property editor for your blog page—that’s the panel on the right when you’re tinkering with a page. Look under “SEO/metatags” for “Title” and “Description.”

Page Title: Keep it short and shove your main keyword in there. Stick to under 60 characters so Google doesn’t chop it.
You can set it static or pull it from your database if your titles are dynamic. Bubble’s got more on this here.
In the above example you can see how I’m injecting this content from my database (though it’s actually coming via Ghost, I’ll cover that in more detail later)Meta Description: This is your quick pitch—280 characters max—that pops up in search results. Again I’m pulling this content from the database, I actually have a workflow set up which writes this text using OpenAI whenever I publish a blog post (more on that later)
2. Chuck in Some Headers for Structure
Headers aren’t just pretty—they help Google figure out your post and keep readers from bouncing. Bubble’s got a switch to flip for this.
Turn On Header Tags: Pop into the “Settings” tab in your app, scroll to “SEO,” and tick “Enable header tags in text elements.” That unlocks H1, H2, and so on in your text options—check Bubble’s guide here.
Set Them Up: For your main blog title—like “Master Bubble Workflows in 5 Steps”—add a text element, set it to H1 in the style dropdown, and link it to your post’s title field if it’s dynamic.
Then, for bits like “Step 1: Plan Your Workflow,” use H2s. Just pick “Heading 2” in the appearance settings. It’s a no-brainer way to keep things tidy for Bubble users and Google.
Depending on how you’re hosting your Bubble blog content you can either add these H tags manually, or if you use the same Ghost method as me it will take care of this formatting for you.
3. Trim Down Images So It Loads Quick
Big images can tank your Bubble site’s speed. Thankfully Bubble has some built in tools to help optimise images.
Wherever you use images in your blog content templates, ideally use the :processed with Imigx function. This means Bubble will automatically optimise the image and serve the smallest version possible.
I use quality at 75% with resize to fit dimensions by cropping enabled. You could even lower this quality setting down if you’re just showing thumbnail images.

4. Link Up Your Pages to Keep Folks Around
It’s really important to make sure you’re linking content in Bubble correctly to make sure Google can index it correctly.
Most importantly - don’t use Buttons or Workflow based links for your content - Google can’t see them!
You need to use the built in Bubble ‘Link’ element type. This formats the link in a way that it’s indexable by Google.

5. Hand Your Sitemap to Google
It’s also important to make sure you’ve enabled Bubble’s sitemaps in your app’s SEO/Metatags settings page. By default Bubble creates a sitemap for you at “yourapp.com/sitemap.xml” with all your public pages, and also a sitemap for each page linked to a database type.
I recommend enabling these three options in your SEO settings.

This means the H tags will be correctly exposed for the content on your pages.
Connecting Ghost & Bubble to serve your site’s blog content.
I searched for a long time for a solution which would let me host a blog on the main root domain of my Bubble app at /blog. I tried out several different methods without great results.
I tried building the blog fully within Bubble, saving the blog content to the Bubble database and serving it from there too.
Unfortunately this had a few drawbacks, firstly all the WYSIWYG editors for actually writing and editing the blog content were pretty poor. And then I also found that serving the blog content from the Bubble DB made pages load far too slowly, and images embedded in posts weren’t optimised.
It was important for me to not only have content served quickly, but to also have a nice writing environment in the editor for creating posts.
This is when I started exploring Ghost more, to see whether I could use it with Bubble to host my blog content.
Ghost not only has a gorgeous post editor and wide support amongst other tools like Zapier, it’s super easy to use and affordable.
At first my plan was to try and point my /blog page directly to Ghost using some URL / DNS tricks with Cloudflare. Unfortunately this didn’t prove to be possible to I started considering other approaches.
This led to me investigating the APIs that Ghost offered. I wondered if there would be a way to host all my blog content in Ghost then dynamically pull it into Bubble and render it on Bubble.
I discovered that Ghost had a Content API which you could use to pull entire post content, including the full HTML of the post.
This returns the following object, including things like the slug, title, post html and a lot more.

My next step was to experiment with setting this up in Bubble via the API connector.
The plan was to pull in the content for a specific blog post using the content API and render it on a page in Bubble.
Thankfully, given that the key that Ghost generates is just for reading content I was able to use the feature in Bubble to ‘attempt to make the call from the browser’ which calls the API directly from the user’s browser making it super fast.
This is how it looks set up in the API connector in Bubble…

So to test this out, we just need to create a post in Ghost, and get it’s ID and past it in to this call to pull the content into Bubble to initialise the API Connector.
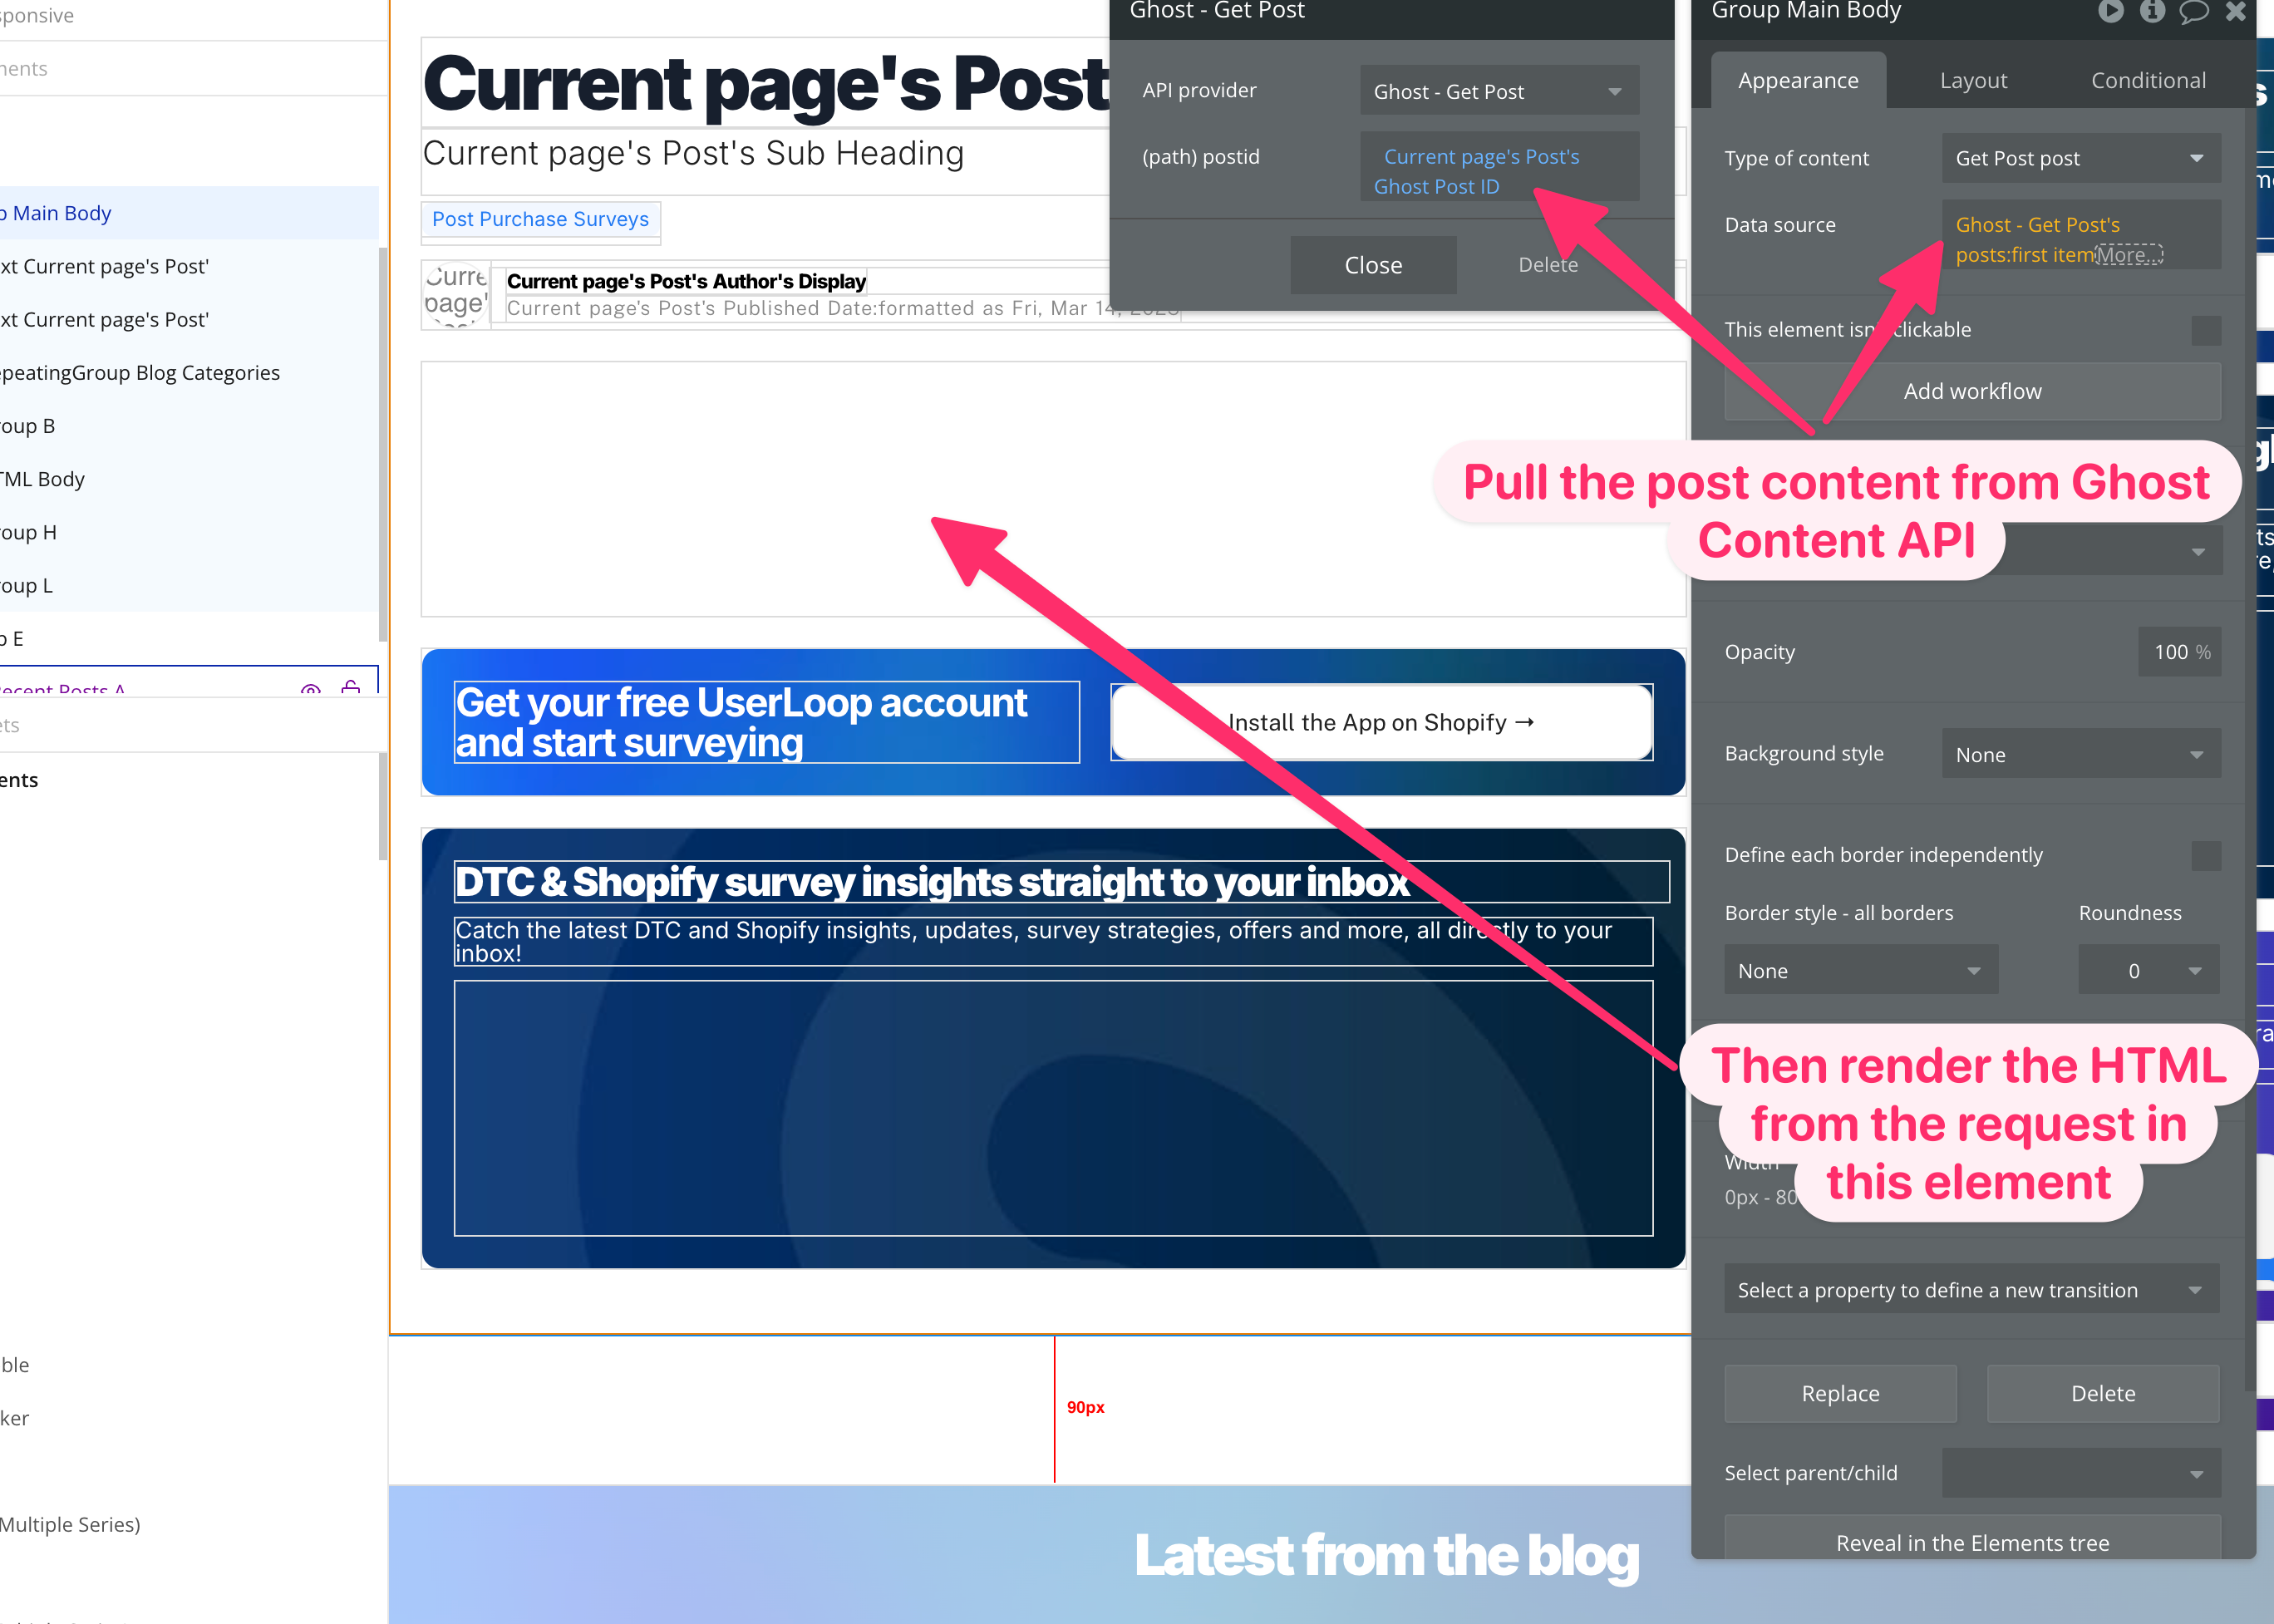
We want to set this up as a data type of ‘Data’ as we’re eventually going to pull this in when a page is loaded and render the content inside a HTML element.
Next, I created a page in Bubble, placed a simple HTML on it and made a group on the page which called the Ghost Content API and pulled in the post data.
Then I just render the ‘html’ value from the post and render it in an HTML element.
I tested this out and it worked really well! The page loaded instantly (the Ghost content API seems to be lightning fast). Even really long posts containing tons of content loaded instantly.
Once I realised this could work well I started looking into the next step, how to sync the content between Ghost and Bubble automatically.
One thing to note is you need to apply a bit of a <style> element in Bubble for everything to style correctly from Ghost with all the proper formatting. If you’d like a copy of the style tag I used to make this work just drop me a reply to this post and I’ll send it over.
Connecting Bubble & Ghost using Webhooks
The first thing I realised is that I would need a simple table in Bubble which stored a few key fields in order to render the pages.
So I created a new data type in Bubble called ‘Post’ with the fields
Ghost Post ID - the ID of the given post from Ghost in order to pull the content over the content API
Post Title - The title of the blog post
Featured Image - The featured image of the post
Snippet - A short 280 Char snippet of the article content for SEO purposes
Author - Optional extra field containing the authour of the post.
You could also add a few other fields, but I just wanted this data type to be very lean and fast loading, after all we’re pulling the bulk of the content from Ghost.
The next step was to keep Ghost in Sync with Bubble.
I decided to do this using Ghost’s webhooks feature.
So heading into Ghost, I created a new integration.
Then I selected custom and ‘Add custom integration.’
Then I gave the integration the name Bubble

Then I needed to set up 2 new webhooks which call backend workflows in Bubble.
One when a new post is published. This creates a new record in the Bubble posts table with the Ghost ID of the new post.
One when a post is updated. If a post is edited in Ghost we want to update Bubble with the new title, image etc. We need another backend workflow to run to make that update.

This is what the Webhook setup looks like in Ghost. You can see the 2 webhooks I set up to keep data in sync.
Back in Bubble I set up 2 new backend workflows using the ‘Detect data’ method which picks up the API request structure from Ghost.
For the create a post workflow these are the steps I use…

Then we want to create a new ‘Post’ in our Bubble database using the data we receive from Ghost.
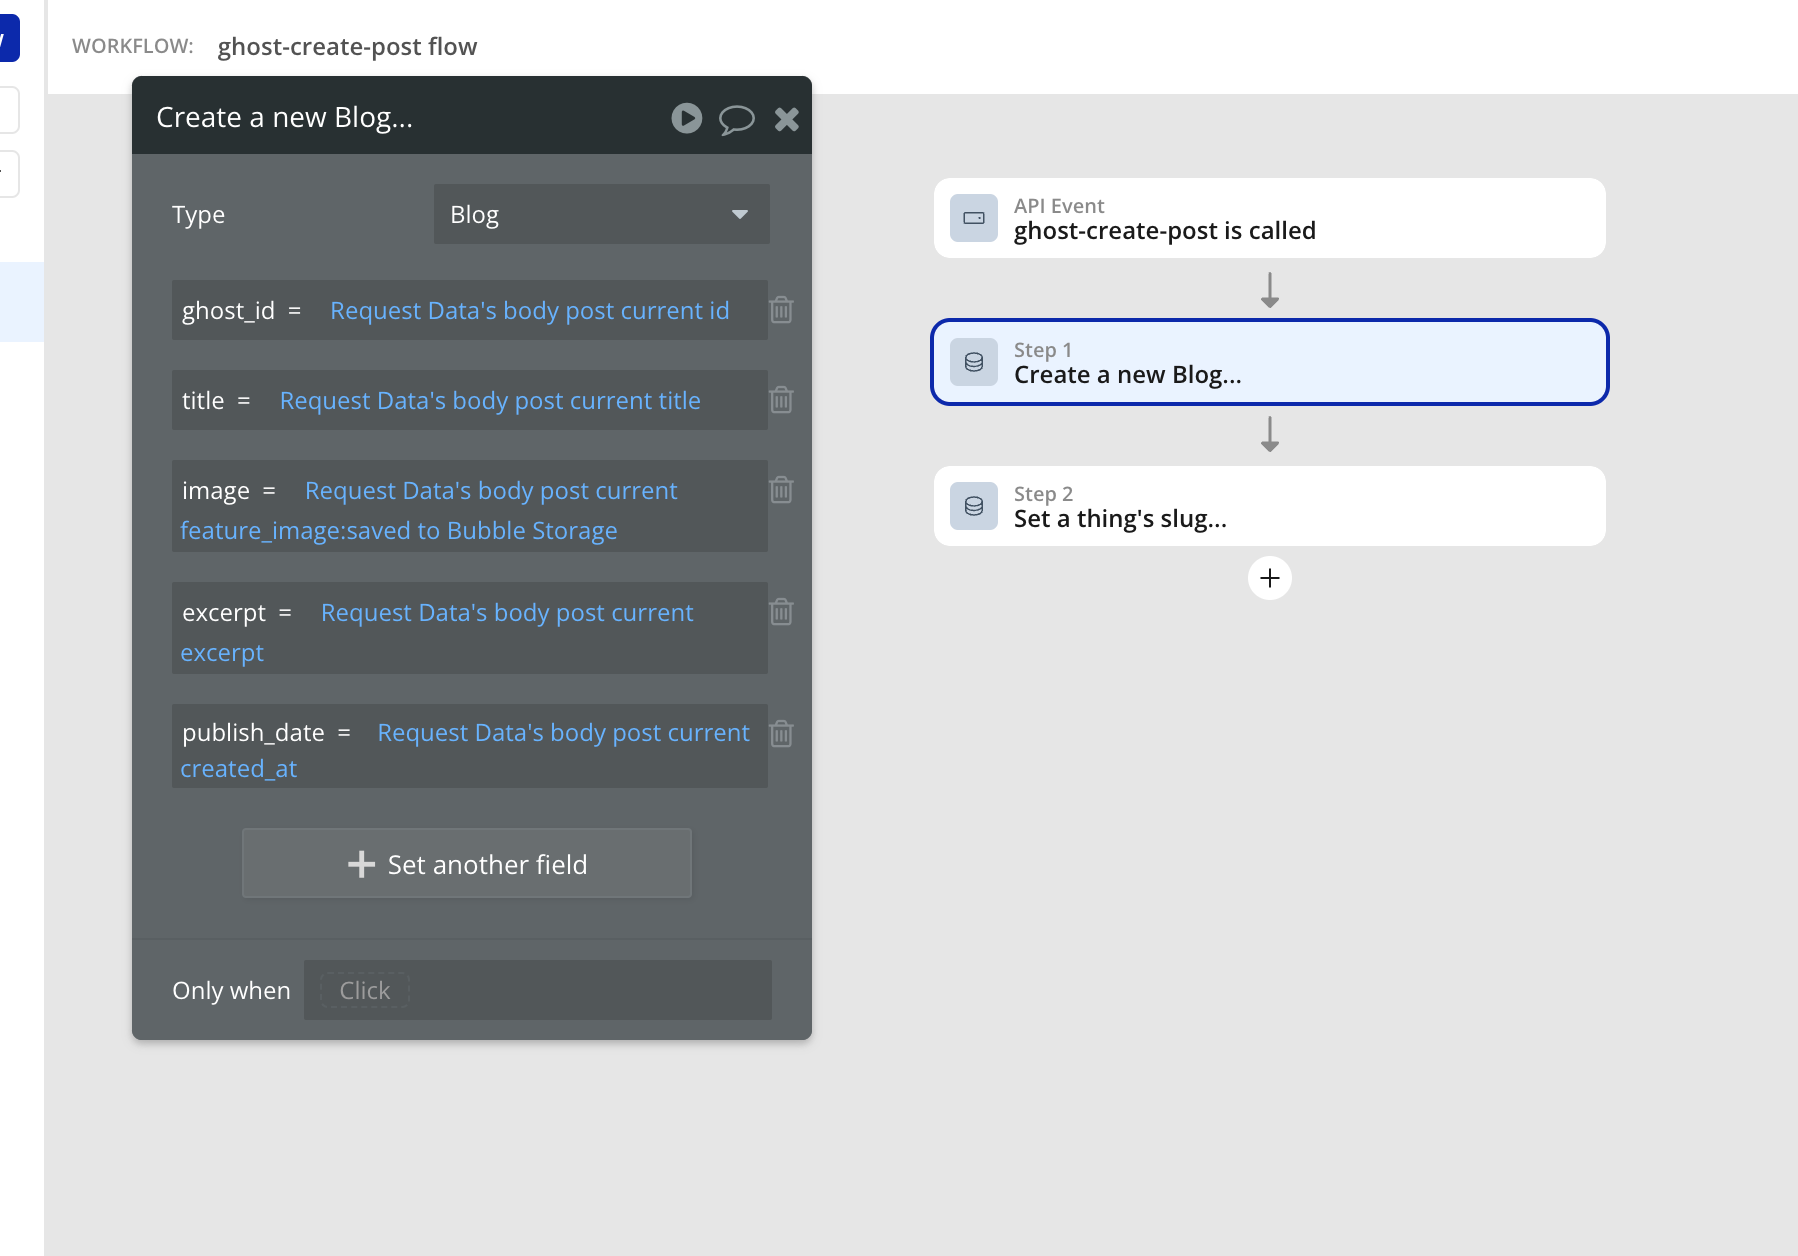
We also get a field called ‘slug’ from Ghost which we want to use to set the slug for the Post in our Bubble database. This means the URL we set in Ghost will be the same in Ghost.

Then we also set up a similar workflow for the update action which basically is doing the same thing but instead of creating a new record it’s searching for existing records matching the given Ghost Post ID.
With all that in place we have everything we need to start publishing content to Bubble from Ghost using the beautiful Ghost post editor.
That’s it for this week!
Hope you find it helpful, let me know if you end up trying this method. I’ve used it across two Bubble apps I work on and it’s been great for helping us rank and made it really easy to publish more content with Bubble.
Don’t forget, the Create With AI Conference I help organise is coming to London on 22nd May. £99 Advance tickets are still available if you’re interested in coming along - we’re going to be talking everything AI and NoCode. It would be great to see you there.
Until next time, happy building!
James
Very interesting topic, thanks.
Have you been able to rank on some keywords and get your articles findable on google ?