How to get the most out of backend API workflows in your Bubble app
API workflows are one of the most powerful parts of Bubble. They allow you to execute complex workflows server-side - even when users are not active on your app, helping you build powerful features.
Hi there!
It’s been a while since the last NoCodeSaaS newsletter, hope you’ve had a great summer.
This is the newsletter where we dive into how to build, maintain and scale profitable software using Bubble.
I run an app called UserLoop - which collects millions of customer survey responses for stores on Shopify. It’s just come round to being 6 months of me working on the app full time and it’s been an exciting journey!
It was a big decision for me to leave my full-time job to work on building on Bubble full time, I had got the app up to a few thousand MRR and felt the time was right to give it a go.
Since then I’ve learned how much I still have to learn about SaaS marketing! I’ve got a few successful traction channels for the app now, we’ll cover in future issues how to experiment and find traction channels for your own app.
I’ve also been working on a few freelance Bubble projects over the summer which has been great. There’s nothing like quite building a product from scratch in Bubble - it always blows my mind how quickly you can build high-quality software that you can earn money from, all without being a programmer!
There’s a new episode of the No Code SaaS podcast which I recorded with Kieran yesterday available - we talked about the new Bubble for Enterprise and SOC 2 support, you can listen to that here.
So with that, let’s get on to today’s topic - backend, or “API'“ workflows in Bubble.
Getting the most out of Bubble API Workflows
My app has over a hundred of these, and they’re key to making things happen for users behind the scenes when they’re not using your app.
They control things like sending email, triggering notifications, posting data to external services and pretty much anything else you can imagine.
There’s another, less well-known way you can use them - from within your own application.
By default, Bubble only lets you schedule workflows from the UI. That means you can only set a API workflow running, you can’t get any data back from it.
One way some apps get around this is by using the API workflow to make changes to the database, which do feed through to the front end.
This isn’t always ideal though, sometimes you want to have a workflow run on the backend and immediately have data returned from it.
Here’s an example of this in my app. In this feature, the user can request a list of recommended answer options for their survey question, this is handled by a backend workflow:
The request is sent to a backend API workflow in the app to write a list of answer options for a survey question the user has written, this is handled with some custom logic and the OpenAI API. The options are then returned from the backend to the frontend and shown in the UI for the user to pick from.
So, how do we actually return data from our backend API workflow to the front end if it isn’t natively possible in Bubble? That’s where things get fun :)
Build your API Workflow
First of all, we need to configure our API workflow correctly in Bubble to allow us to call it from our app’s front end.
To do this, create a new API workflow and select the following options.
Check the box to expose it as a public workflow
Leave the ‘This workflow can be run without authentication box unchecked’ - this means and API key will be required to run the workflow and makes it more secure. If you do decide to check this box anyone will be able to run your workflow. For some use cases this might be ok, but in general it’s best to keep it secure.
In this example, we want to trigger this workflow as a POST - but there may be times when you want to use GET.
We also need to declare what the inputs to our API workflow are. What data are we sending in? In my example above, we’re sending in the user’s company and their question. That means we can use them in our workflow.
The next step is to build the workflow itself, this will vary depending on what your app does!
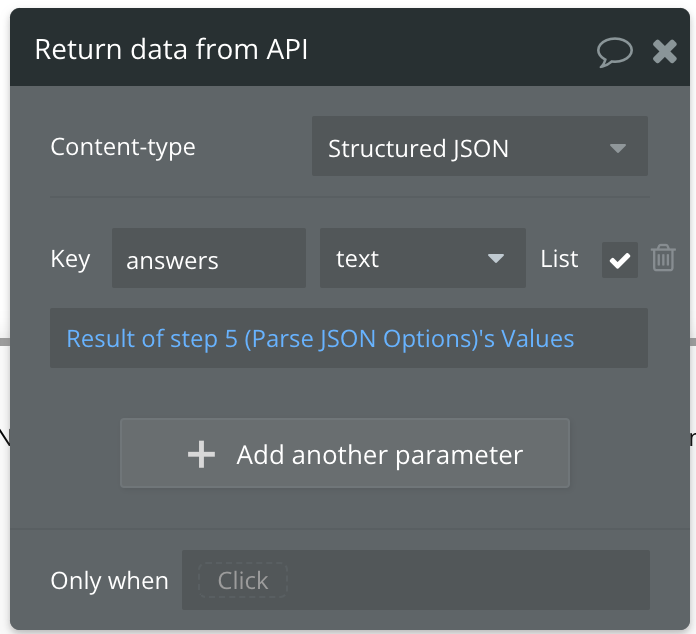
However, once you’ve got the data you want, we need to end the workflow with the ‘Return data from API’ action, which is hidden in the data section.
This will take the data from your workflow and return it in the request.
In my example, we want to return a list of answers. This will come back as a list of texts.
Once we have our workflow all set up, we need to move on to the next step - hooking it up the API connector!
Setting up the Bubble API Connector
This is where things get interesting, we’re going to call our backend workflow from the API connector in the same app.
This basically means the app is going to be making a request to itself, but it lets us do clever things like returning our data from the backend workflow!
Here’s what the setup in the API connector looks like…
We’ve given our API a name
We’re using it as an Action - this means we can use it from workflows in our app’s front end
We’ve set it as a POST request to match our API workflow
We’ve added the domain for our app, in this case the test version (/version-test)
We’ve added the name of our workflow to the end of the URL
We’ve added a header for ‘Authorization’ and added the value ‘Bearer’ and an API key we generated from our app’s API tab in the API tokens section. This makes the request secure, make sure you check the ‘private’ option to hide your key.
We’ve then added our data inputs as parameters, in my case company and question.
For the data type ‘company’ we will need to send the backend the unique id of that company.
Make sure you format any text fields as being JSON safe, wrapping them in ““ - you can do this automatically from the workflows in your frontend later.
Once you’ve got this all setup, you can hit the ‘Initialize call’ button and the request should run.
This will then run the backend workflow, and hopefully return your data.
You can use the ‘raw data’ mode in the preview window to see the exact data your backend workflow returned.
As you can see in our example, we get a list of answer options which we can then show in our app’s front end.
Once you’ve got your API all set up and you’re happy with the data you’re seeing in the preview - we’re ready to go and use it our app’s front end!
Calling a API Workflow from your app’s front end
So now we need to call our backend from the front end. You can use it just like any other external API so the possibilities are pretty much endless.
In my example, I want to call it when the user presses the ‘Suggest Answers’ button and load the results into the repeating group below.
Here’s what the workflow behind that button looks like..
As you can see, we’ve added this API endpoint to our workflow as an action, and we now need to populate the current user’s company/question.
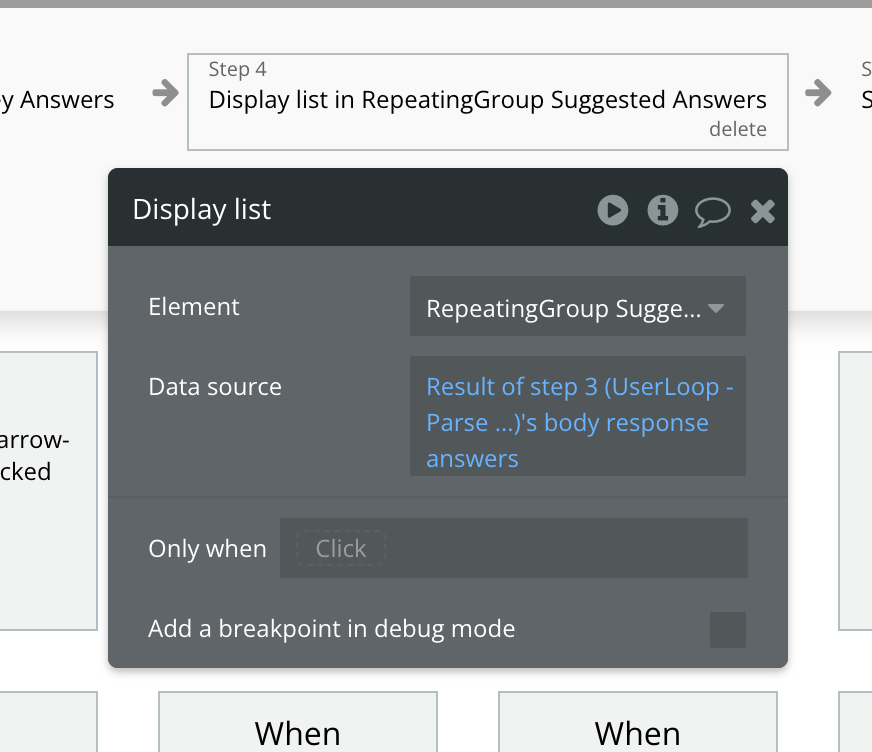
The next step in the workflow is to take the data we get back from the request and show it in our repeating group.
As you can see, we’re using the action to Display list in our repeating group, and taking the response from the previous step in the workflow (our API call).
This will then render the list of texts in the repeating group like the demo we showed earlier.
One additional tip - it’s sensible to dynamically set your the URL for your request. It’s not ideal to hard code as it means it won’t work correctly if you switch versions, or between live and development versions.
To fix this we need to head back to the API Connector plugin…
Where we have our app’s domain, we want to replace it with a dynamic parameter in [square brackets] - this will let us dynamically set the URL of the request.
Make sure you uncheck the private checkbox so we can set this from the front end.
Head back to our workflow in the editor, and in the new domain parameter, use the operator Website home URL. This means whatever version, live, development or other - your request will always be made to the right place.
This basic concept can be used for all sorts of things and is a really useful tool to have up your sleeve when working with more complex workflows in Bubble.
I hope you’ve found this issue helpful, if you have any topics you’d like me to cover in future please do drop me a reply to this email.
That’s it for this week - and happy building!


