

How to connect Bubble to n8n AI Agents

Hi there!
Welcome to this week’s NoCode SaaS newsletter, where I take you along on the ride of building a profitable SaaS business without code using Bubble and AI tools.
This week I wanted to focus on adding AI agent capabilities to your Bubble app visually without any code at all.
If you’re like me, you’ve probably seen a ton of hype around n8n recently. Whether it’s on YouTube, X or LinkedIn it’s almost impossible to escape the endless screenshots of super complex workflows that people are sharing.
I admit there is a lot of quite over hyped content around n8n, sometimes showing fake workflows that don’t stand up to scrutiny when you actually try and use them for real in production.
However, over the last few week’s I’ve been really diving into n8n and using it a lot more to help with real life day to day operations in two companies I’m working on, UserLoop and Create With.
It’s some of the most fun I’ve had building things since I first discovered Bubble 7 (😱) years ago. The standout feature in n8n which got me so excited to learn it is AI Agents.
So rather than just building regular workflows that complete tasks in a predefined order one step at a time, you can add intelligent agents which have access to a set of tools and can actually take actions based on the instructions you give them.
What is n8n?
For those who haven't encountered it yet, n8n is a workflow automation platform that lets you connect different apps and services together without writing code.
For people coming from the Bubble world - it’s effectively a combinations of Bubble’s backend workflows and API Connector. But with some added extra AI magic we’ll talk more about in a bit.
While you might be familiar with tools like Zapier or Make, n8n takes a different approach that gives you way more control and flexibility.
While this does mean it can be a bit more intimidating for beginners with a slightly steeper learning curve, putting in the extra time to learn it really pays off.
The key difference that sets n8n apart is its open architecture. You're not limited to pre-built integrations - you can connect to virtually any API, write custom code snippets when needed, and even create your own nodes. This means you can automate processes that would be impossible with other tools, especially when you need to handle complex business logic or unusual data transformations.
To make things even easier, n8n recently really enhanced their support for Community Nodes. These are wrappers for various APIs and services that members of the n8n community have put together to make it super easy to connect to services like Firecrawl even thought there isn’t an official integration.
You can install them in one click and everything is set up and ready to go for you.
The interface itself is pretty intuitive - you drag and drop nodes onto a canvas and connect them visually. But don't let the simplicity fool you. Under the hood, you're actually building with the super powerful AI framework Langchain.
As a result you can build some absolutely mindblowing automations that can rival custom coded solutions, all without touching a single line of code.
Why n8n is Exploding Right Now
I think one of the biggest reasons for n8n's explosive growth is actually their approach to hosting.
Unlike most SaaS tools that lock you into their pricing tiers, n8n gives you genuine choice - and that's been critical to their success.
You can start with n8n Cloud if you want the simplest setup. It's hosted, managed, and you don't need to worry about any technical stuff. But here's where it gets interesting - you're not trapped there.
The self-hosting option is what really sets n8n apart. We actually host our internal Create With n8n instance on Elest.io for just $10/month, and it completes thousands of tasks without a problem.
Elest.io even handles automatically updating the n8n software for us every week, and keeps backups. So even though it’s self hosted it feels a lot like a SaaS type experience.
Think about that for a second - we're running complex AI workflows, handling massive volumes of automation, and our monthly hosting cost is less than most people spend on coffee.
This flexibility means you can start small with the cloud version, then as you scale up and understand your usage patterns, you can move to self-hosting and dramatically reduce your costs.
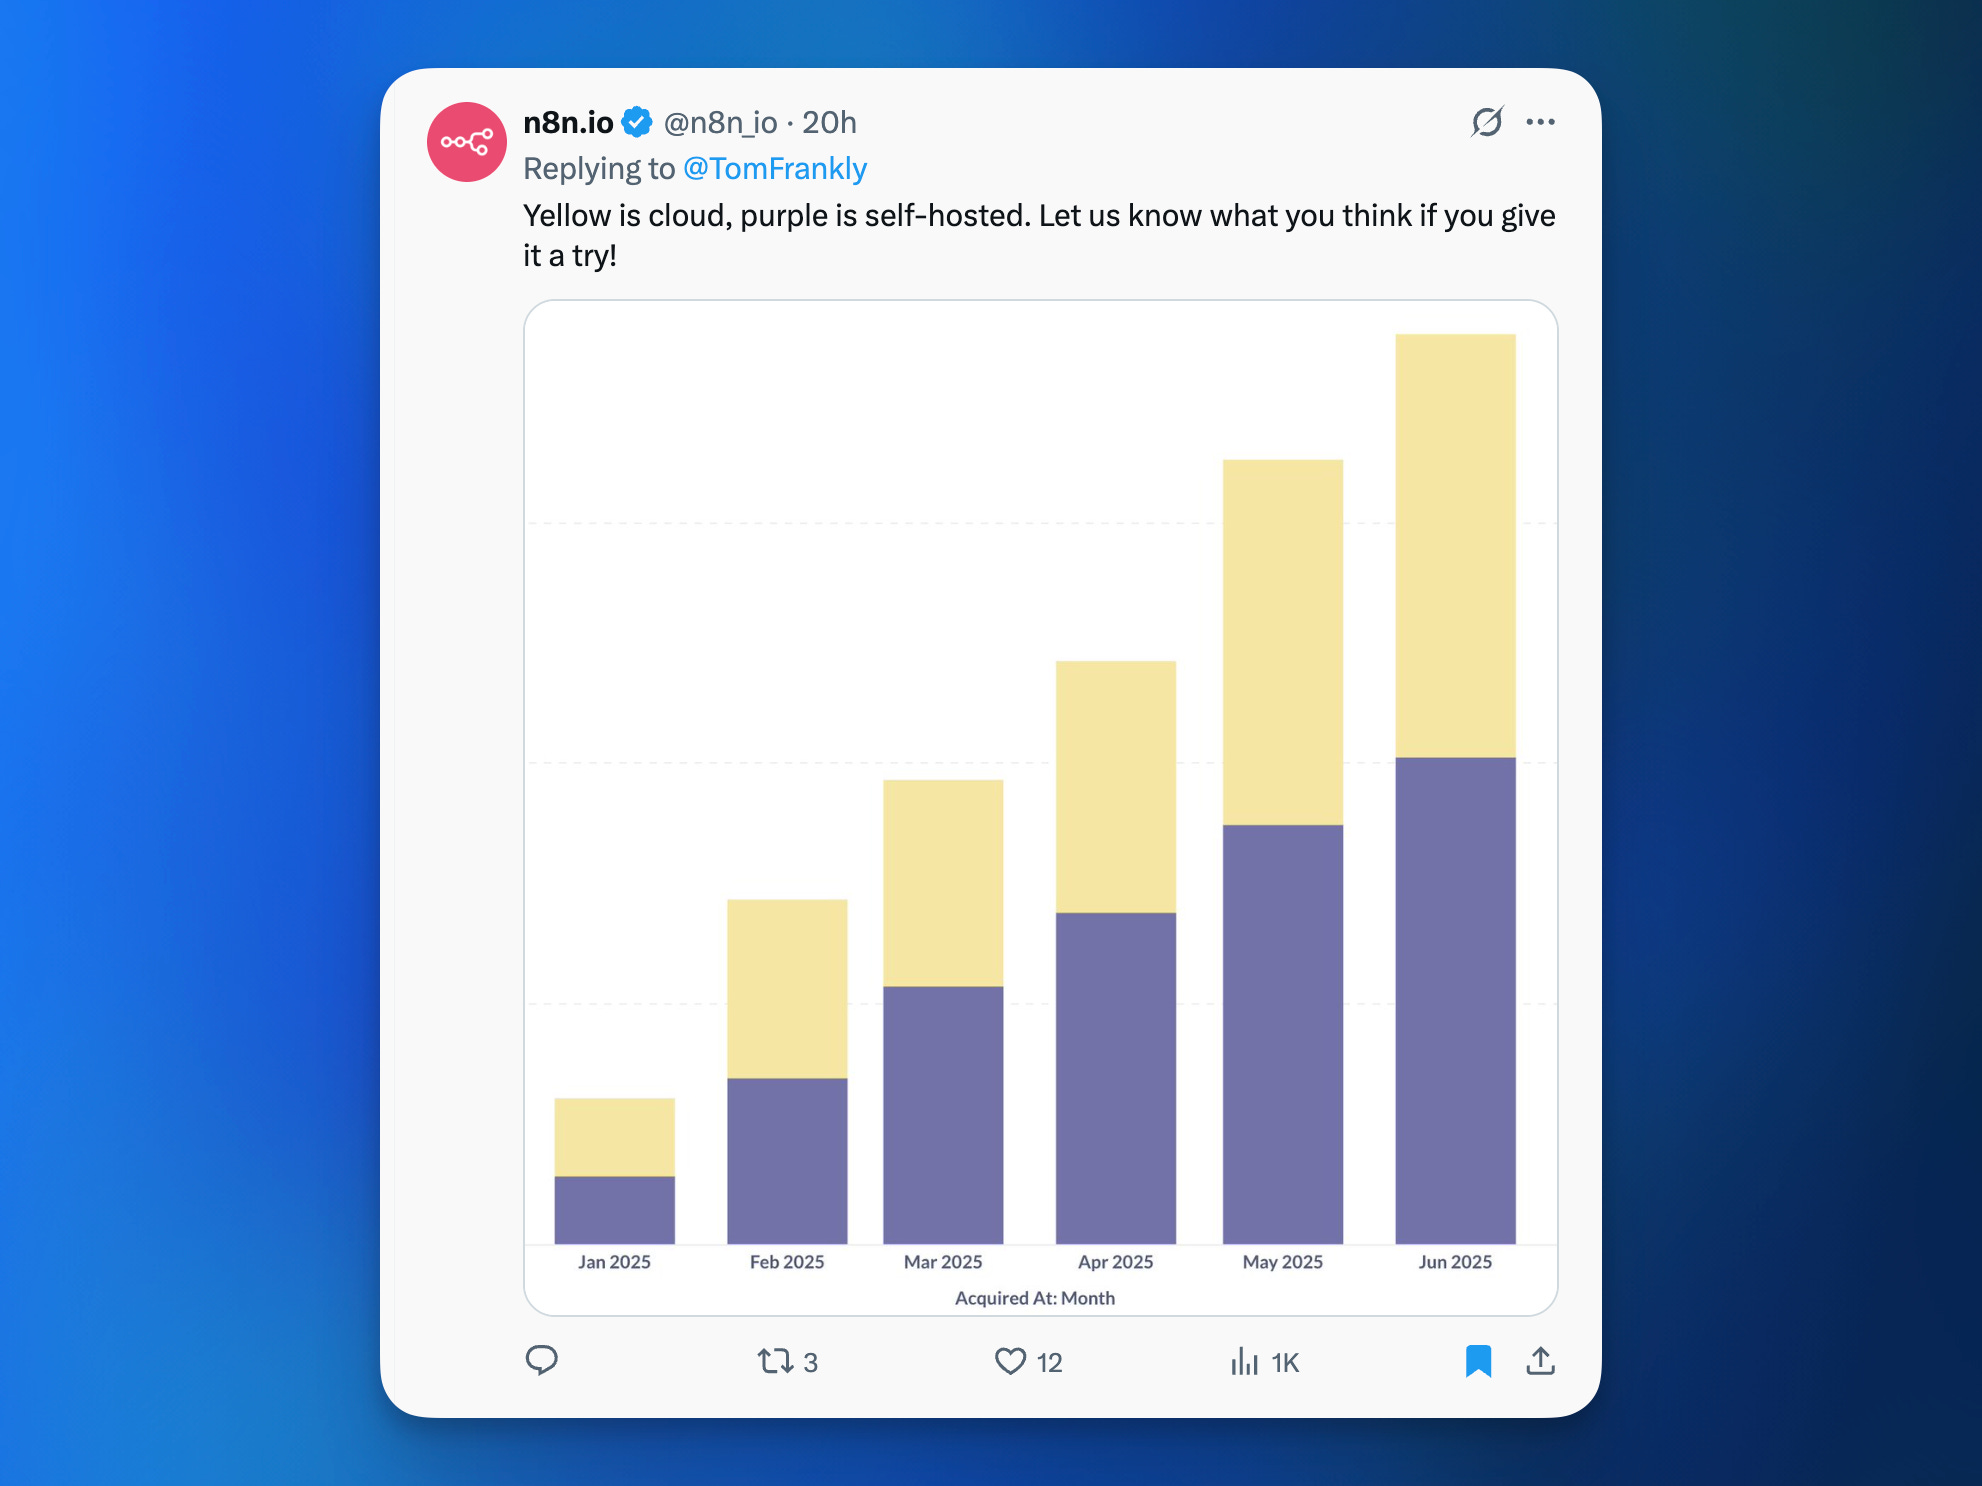
This chart caught my attention this week, showing the breakdown in n8n’s growth between self hosted (purple) and cloud (yellow) - there’s actually a fairly even split between them. So not everyone is self hosting, many are also just using n8n’s own cloud hosted version!
The one major downside of self hosting n8n is that it requires a little more setup when it comes to connecting external services. Whereas the cloud version takes care of most of this for you with simple one click integrations, the self hosted version requires you to do more manual setup for each tool you want to connect to.
However, the n8n docs are incredible and guide you step by step through hooking everything up, plus there are endless amazing tutorials on YouTube for everything you could want to connect.
So that’s a bit of context around why I’ve been getting so excited about n8n. The combination of AI agents, self hosting and tons of integrations makes it an indespensbible tool in every nocoder’s back pocket.
And what’s more, it integrates super easily with my all time favourite nocode tool - Bubble!
Let’s dive into building your first n8n AI agent and hooking it up to Bubble.
Connecting Bubble to an AI Agent in n8n
Bubble doesn’t have any built in AI Agent functionality right now, but thankfully it’s super easy to hook it up to n8n and start building custom agents.
For this mini tutorial I’m going to assume you already have an n8n account set up and running, and have added your OpenAI API key as a credential.
If you’re totally new to n8n and are interested in self hosting it I recommend checking out this YouTube video which guides you through deploying n8n self hosted on elest.io
We’re going to be connecting to n8n via the API Connector in Bubble, and optionally accepting a response back via a backend workflow to deliver the result of our agent back into Bubble.
For the tutorial I’m going to build a simple AI Agent which will help us onboard new users to a SaaS app.
Here’s what it will do…
Bubble will send a POST request to n8n using the API Connector whenever a new user signs up.
The POST request will include some basic info about the user who signed up like their name, email, company name, domain name and the plan they selected.
When this lands in n8n it will trigger our Webhook trigger and start our workflow running.
We will then go straight into an AI Agent node which we will give some instuctions to telling it to write a personalised welcome email to the user.
It will have access to a couple of tools…
Firecrawl to crawl the user’s website (we will get the domain passed to us from Bubble). This will return us a block of markdown which we can feed into the agent to help it personalise it’s email to the user.
Gmail to send a email to the user from my Gmail account.
We can then optionally also return that data back to Bubble via another HTTP request which hits a backend workflow in Bubble.
Step 1: Setting Up Your n8n Workflow
First things first - we need to create our n8n workflow. I'm going to assume you've already got n8n set up (either cloud or self-hosted) and have added your OpenAI API key as a credential.

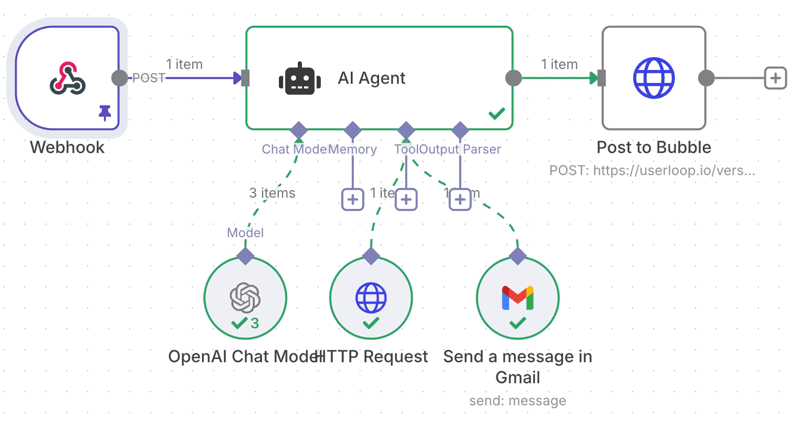
The workflow is pretty straightforward - we've got 4 main nodes:
Webhook - This receives the POST request from Bubble
AI Agent - The brain of our operation that writes the welcome email
Three tools connected to the AI Agent - OpenAI Chat Model, HTTP Request (for Firecrawl), and Gmail
Post to Bubble - Sends the result back to Bubble (optional)
Let's build this step by step.
Step 2: Creating the Webhook Trigger
Start by adding a Webhook node to your canvas. This is what will receive the data from Bubble.

Click on the Webhook node and you'll see all the configuration options. The key things to note:
HTTP Method: Set this to POST
Path: You can leave this blank or add a custom path like
/new-userAuthentication: For testing, you can set this to "None", but for production I'd recommend setting up Bearer Token authentication
The webhook will automatically generate a URL that looks something like: https://n8n.yourdomain.com/webhook-test/yourwebhookid
Copy this URL - you'll need it for the Bubble API call later.
Step 3: Setting Up the Bubble API Call
Now let's switch over to Bubble and set up the API call that will trigger our n8n workflow.

In Bubble, go to your API Connector and create a new API:
Name: "New Signup" (or whatever makes sense for you)
Authentication: If you set up Bearer Token auth in n8n, add that here. Otherwise leave as "None"
Shared headers: Leave blank for now
Create a new call:
Use as: Data
Data type: JSON
Method: POST
URL: Paste that webhook URL you copied from n8n
Headers: Add
Authorization: Bearer YOUR_TOKENif you're using authBody type: JSON
In the body, you'll want to send all the user data that the agent might need:
{
  "first_name": "<first_name>",
  "email_address": "<email>",
  "last_name": "<last_name>",
  "source": "<source>",
  "company": "<company>",
  "website": "<website>",
  "plan": "<plan>"
}
Replace the <> values with dynamic data from your Bubble app.
This is just some example data from my app that I want the agent to have to complete it’s task, so you should just inject whatever you want to send to n8n from Bubble here.
Step 4: Setting Up the AI Agent
Now for the exciting part - the AI Agent! Add an AI Agent node and connect it to your webhook.

Here's where the magic happens. In the System Message field, you want to give your agent clear instructions about what it should do.
Here's what I used:
Your job is to write a personal welcome email to new users signing up to the UserLoop survey app.

Use the website GET tool to get the user's website to help customise your welcome message and make it more personal.

Keep the email friendly, professional, and around 150-200 words.
The key here is being specific about what you want the agent to do, but not being too prescriptive about how it should do it.
You want to give it enough flexibility to be creative while staying on task.
Give it instructions on when it should use tools, and what it should use them for.
Step 5: Adding Tools to Your Agent
This is where n8n really shines. We're going to give our agent access to three tools:
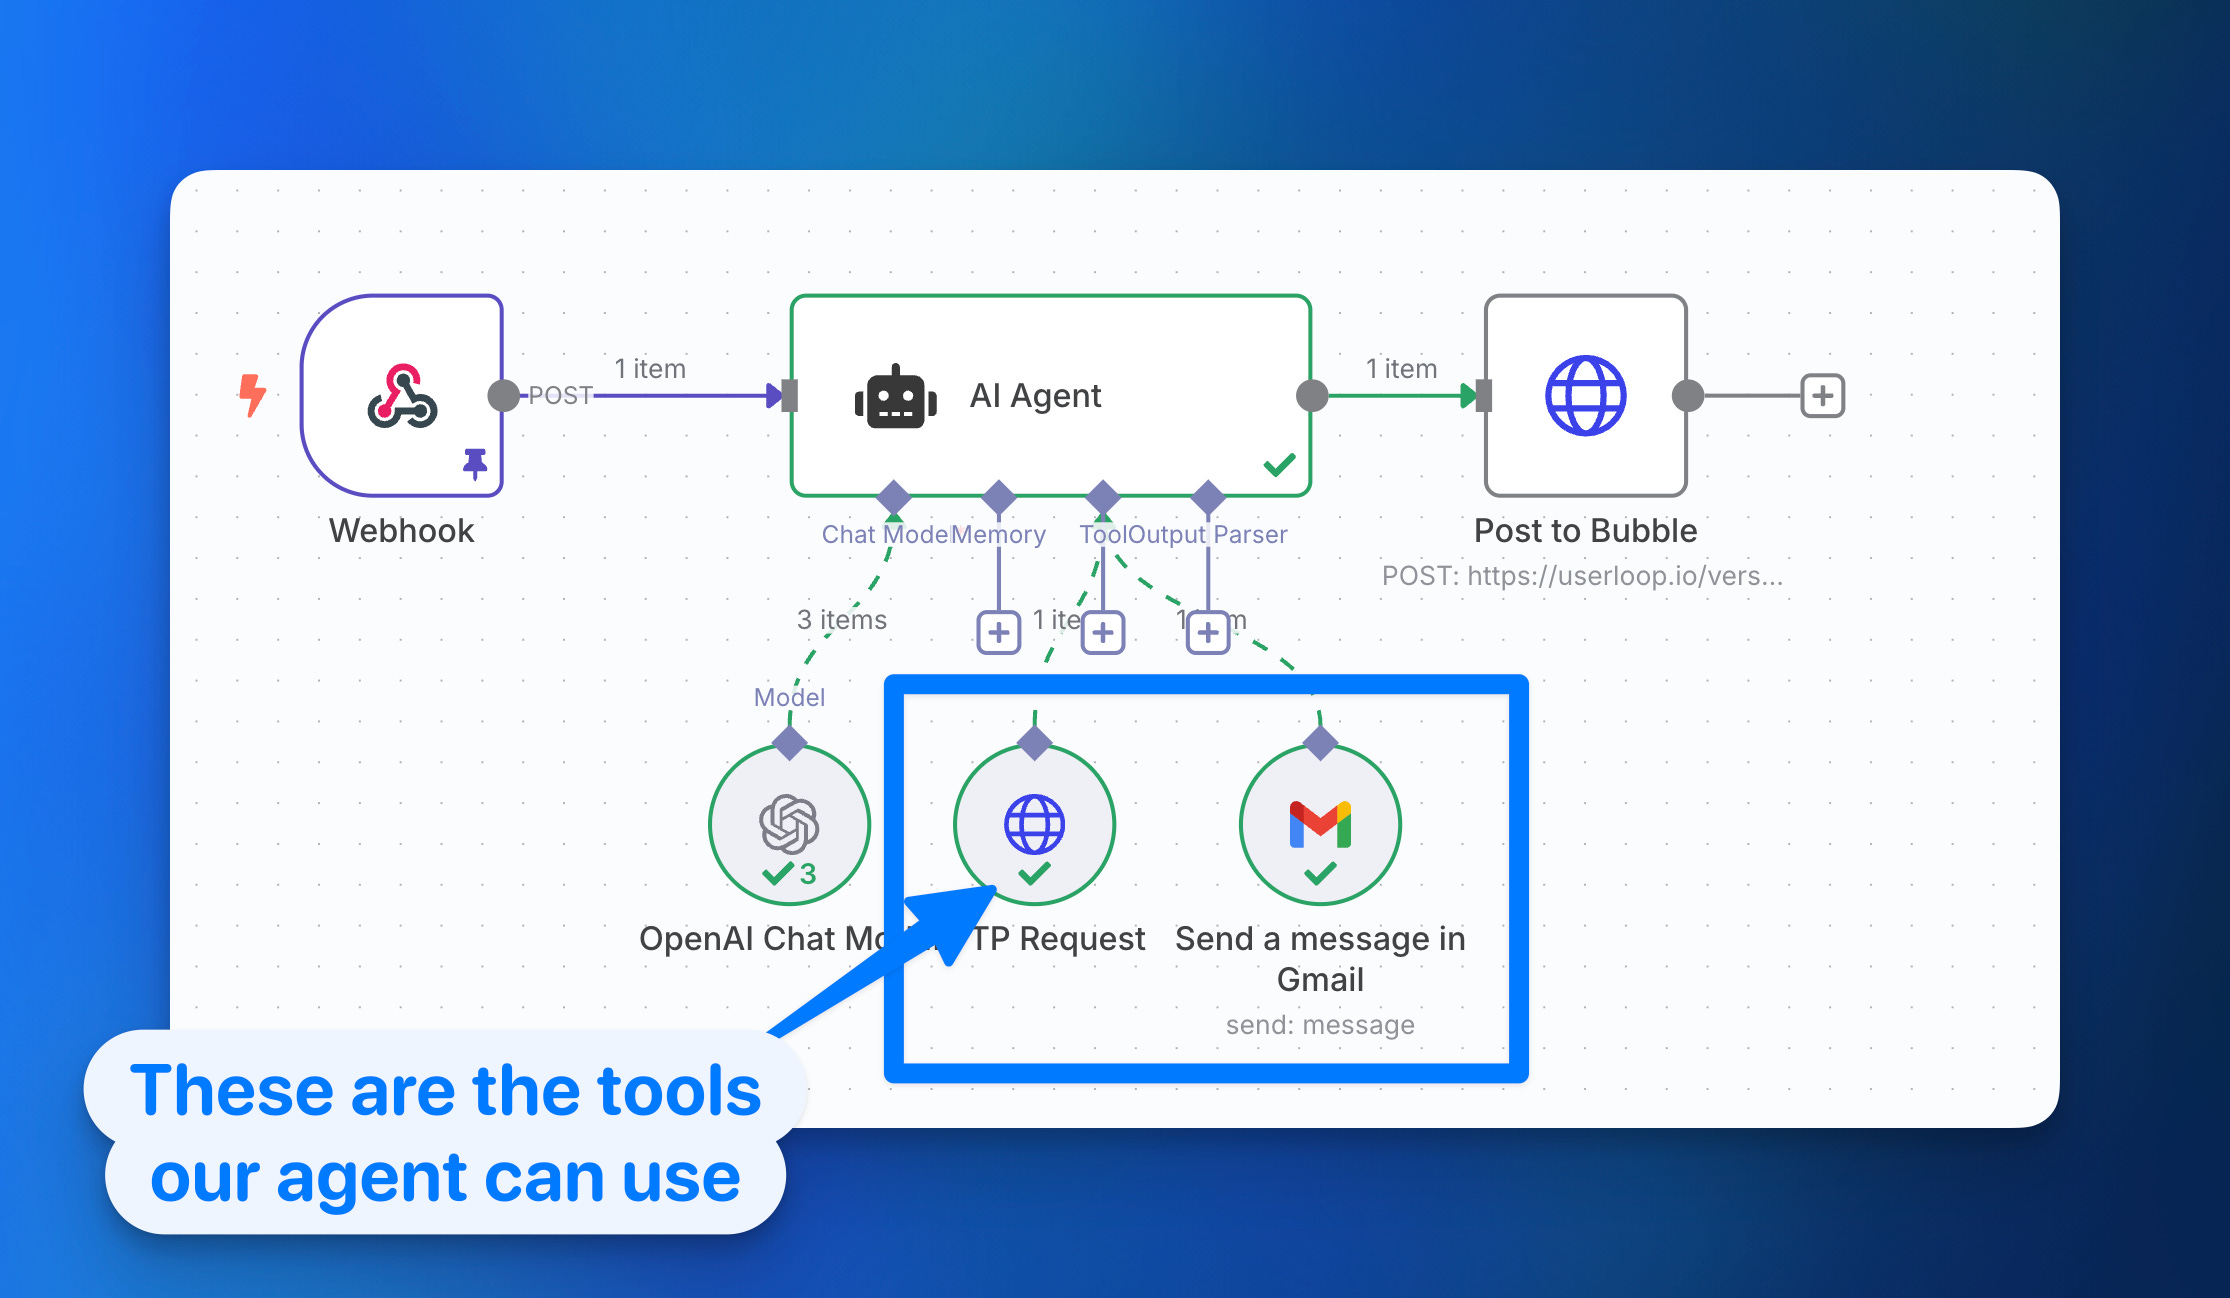
Tool 1: OpenAI Chat Model
This is the "brain" that will actually write the email content. Connect an OpenAI Chat Model node to your AI Agent.
I recommend using either the 4.1 model or o3 for more complex tasks.
Tool 2: HTTP Request (Firecrawl)
This tool will crawl the user's website to get content that the agent can use to personalise the email. Add an HTTP Request node and configure it to call the Firecrawl API.
You'll need to sign up for a Firecrawl account and get an API key. The HTTP Request should be set up like this:
Method: POST
URL:
https://api.firecrawl.dev/v0/scrapeHeaders:
Authorization: Bearer YOUR_FIRECRAWL_API_KEYBody:
{"url": "{{website_url_from_bubble}}"}
Tool 3: Gmail
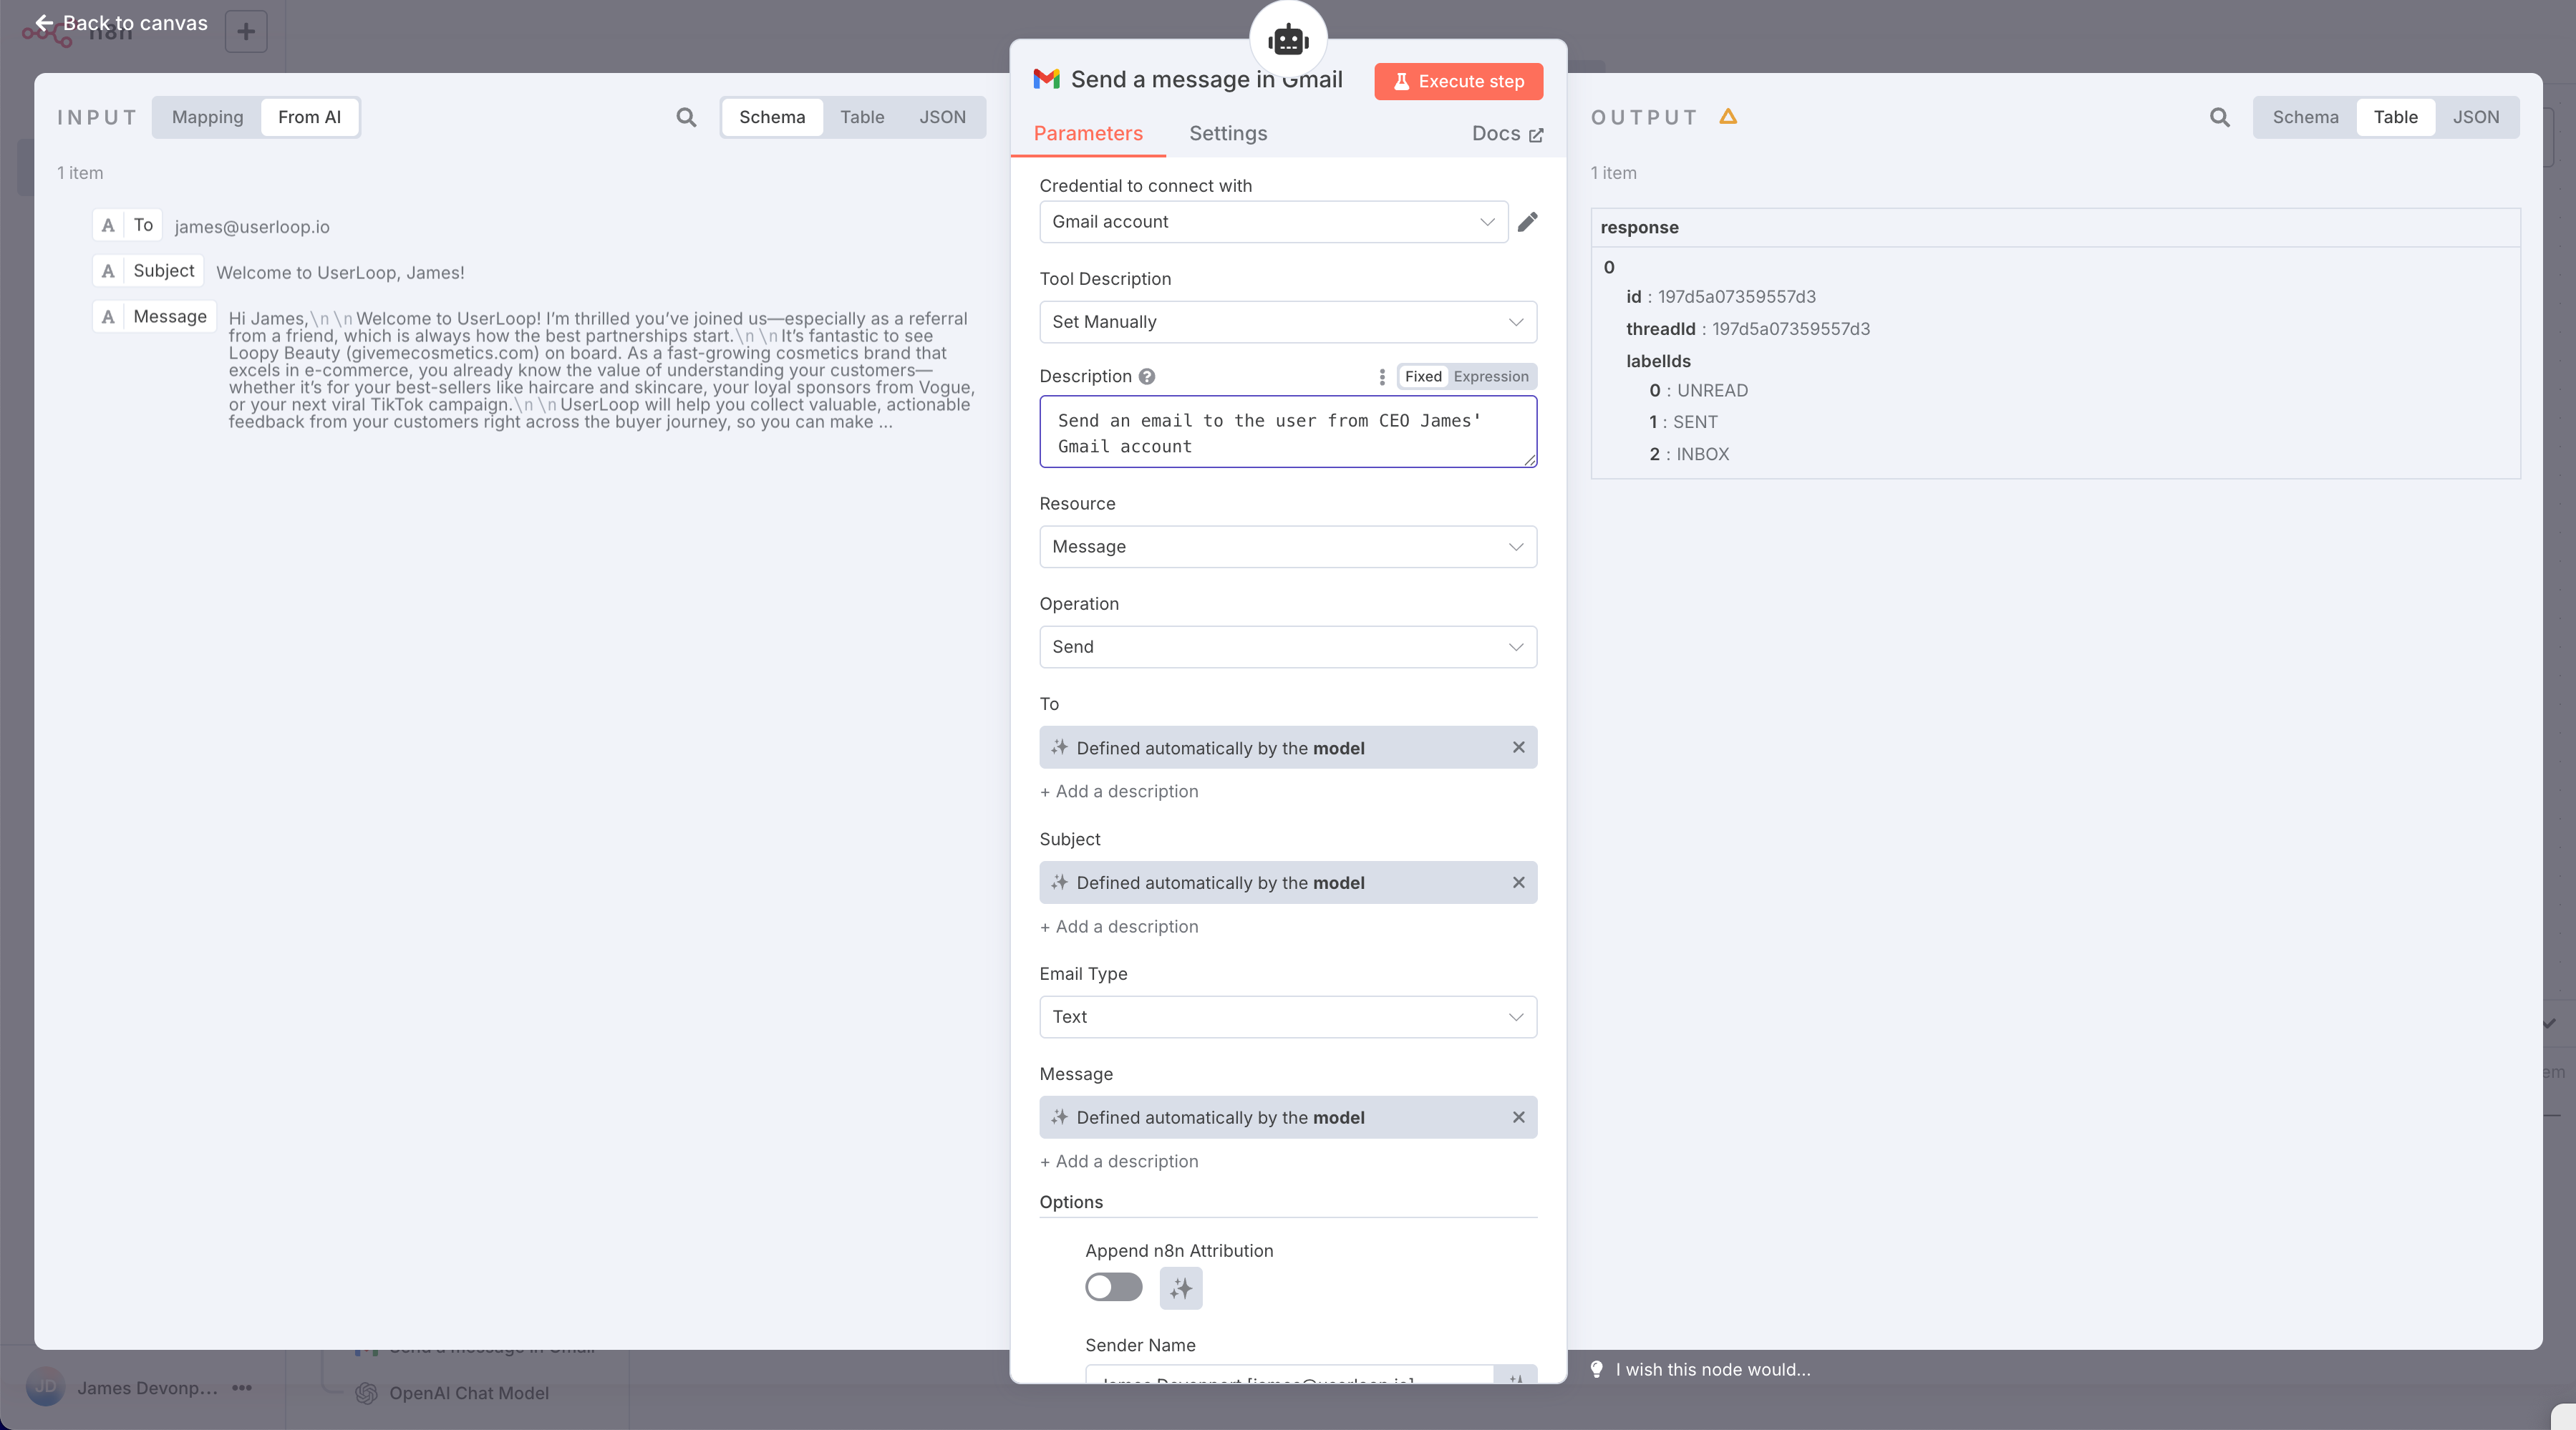
Add a Gmail node and connect it to your AI Agent. You'll need to authenticate with your Gmail account (n8n will walk you through this process).
The cool thing here is that you can set most of the fields to be "Defined automatically by the model" - this means the AI Agent will decide what to put in the subject line, email body, etc based on the data it has.
No fiddling around with annoying parameters, just click the magic icon and the agent will populate the field with the required data. This feature has made setting up agents in n8n so much easier!
Step 6: Optional - Setting Up the Response Handler
If you want to get the AI-generated email content back into Bubble (maybe to save it to your database or show it to the user), you can set up a response handler.

In your n8n workflow, add a final HTTP Request node that posts back to a Bubble backend workflow:
Method: POST
URL: Your Bubble backend workflow endpoint
Body: The generated email content from the AI Agent
Then in Bubble, create a backend workflow that accepts this data and does whatever you want with it.
Don’t forget to make this workflow public, and if it’s not a secure endpoint allow it to be run without authentication. If it needs to be a secure endpoint leave this unchecked and add an…
Authrozation: Bearer <Get this key from your Bubble API settings tab>
This will allow n8n to connect to Bubble securely.
Step 7: Testing Your Integration
Here's the fun part - let's test it!
Test the n8n workflow first: Use the "Execute workflow" button in n8n with some sample data
Test the Bubble API call: Use the "Initialize call" button in Bubble's API Connector
Test the full integration: Trigger the API call from a workflow in your Bubble app
When this agent ran, it scraped this demo website, wrote an email tailored to the user and then sent it via my Gmail account from me in my persona, here’s what that looked like…

The quality of your AI Agent's output is heavily dependent on the instructions you give it.
Don't be afraid to iterate and refine your prompts based on the results you're getting. n8n also recently added evaluations which can let you see how changes you make to your prompting makes to the end result.
The beauty of this setup is that once it's working, you can easily extend it. Want to add more tools? Just connect them to your AI Agent. Want to change the email template? Just update the system message. Want to add more data from Bubble? Just update the API call.
Honestly once you build your first of these you’ll be totally hooked. I can’t beliveve some of the things I’ve been able to build over the last few weeks (espescially when you hook your agent up to a RAG database).
This is just scratching the surface of what's possible when you combine Bubble's frontend power with n8n's AI capabilities.
In my next newsletter, I’m going to cover how to give your agents even more superpowers by using MCP servers in n8n - this is honestly so cool I can’t wait to write it up!
Let me know how you get on with this setup, I'd love to hear about the creative ways you're using AI agents in your apps!
As always if you have any feedback or questions drop me a reply to this issue, I really love hearing from you.
Happy building!!
James.