📈 How to connect Bubble to Mixpanel to monitor your app. NoCodeSaaS - Issue #28
Welcome to the NoCodeSaaS, the newsletter that helps you grow a successful SaaS business on Bubble without being a programmer.
This is the first issue in a while - I’ve been super busy building my own Bubble app UserLoop, so apologies for the gap!
Since the last issue, I’ve also launched a new podcast with Kieran and Glenn.
Every week we discuss the ups, downs and technicalities of building and scaling a SaaS business without code. It’s totally free and you can subscribe here.
In this issue of the newsletter, we will be looking at how to use Mixpanel to monitor your Bubble application.
It’s a great tool for understanding which features customers are using, how they complete key flows in your application and even for monitoring things like API errors. FYI: this isn’t sponsored by them I just really like the tool 😂
So with that, let’s get on with the issue!
Why Mixpanel?
As my app has grown, I started to crave more visibility over what was happening at every level in the application.
I wanted to answer questions like…
What features are customers using?
Is everything running smoothly with emails being sent out?
What are the conversion rates for key flows in my app?
Are all the API calls my app is making succeeding, how many API errors am I getting?
In the early stages of building your app you can answer many of these questions simply by looking at your Bubble app logs.
However, once your app starts running a huge number of workflows things can get more difficult to manage.
UserLoop is now running around a million workflows a month, so it’s important for me to know when things are going wrong.
I looked into tons of monitoring tools in order to monitor my app and in the end settled on Mixpanel for a few reasons.
It has a free plan which covers basic usage
They have a startup program which gives you tons of free credit for a year to try out all features for free
When the free startup plan ends in about a year I estimate my monthly bill would be around £35. Given what I’ve seen so far I think that will be worth it for me.
Mixpanel can also send your alerts when certain thresholds are met. If your app starts getting errors on a certain thing, you can be notified about it.
Here are some examples of the kinds of monitoring I have set up with Bubble + Mixpanel.
Tracking key activities in the UserLoop application.
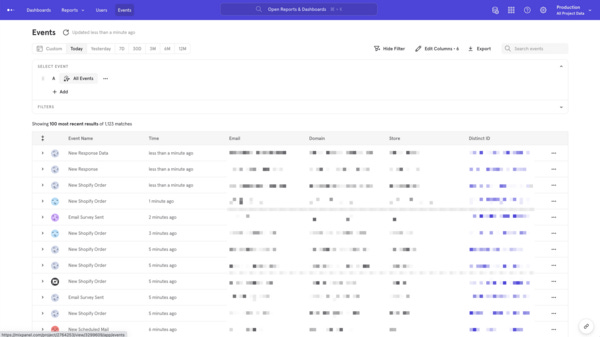
This is what the event stream from Bubble to Mixpanel looks like, a line for every user event.
Monitor API Errors in your Bubble App from Mixpanel
How to implement Mixpanel with Bubble
I did quite a bit of reading into Mixpanel when planning the implementation with my Bubble app.
There is an official Mixpanel plugin for Bubble. This can be a good way to get started if you just want to try things out.
However, I decided not to use the plugin for one main reason… it only works on the front end of your app.
The main thing I wanted to be able to monitor was actions taken by my backend workflows. So I decided to do my own implementation using the API connector and Mixpanel API directly.
This also avoids some of the other issues with calling Mixpanel from the front end. It can often be blocked by adblockers, and I didn’t want to add any code to the front end of my application which might slow it down.
Calling the Mixpanel API using a backend workflow means I can be confident I’m getting an accurate picture of what’s going on and not missing out on any data.
Setting up a Mixpanel account
Before getting started you need to sign up for a free Mixpanel account and create a project.
I recommend setting up two projects: one each for your production and development environments.
You don’t want to pollute your production analytics with all the tests you run on your dev environment so setting up two environments helps avoid this.
For each of your Mixpanel projects, head into your account settings and pick up the token for each project. This is the unique ID we’re going to use to send our app data into Mixpanel’s API
Setting up Mixpanel with the Bubble API Connector
Once you’ve got your projects set up and your tokens, it’s time to get to work setting up the Bubble API connector.
The good news here is that you can do everything you need with a single API call.
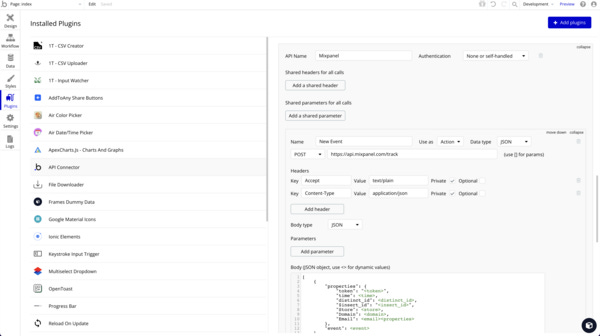
Set up a new POST endpoint to be used as an Action with the data type JSON to the endpoint https://api.mixpanel.com/track
Here’s the relevant Mixpanel documentation for the above endpoint.
Add in the headers as in the image below.
Need a copy of this API call? Hit reply and I will send it over.
For the body, we are going to create some dynamic values that we can use to inject data for the event we want to send.
The fields are…
Token. The Mixpanel Project Token
Time. The time the event occurred in UNIX
Distinct ID. This is the unique ID you use to track your users by. I recommend using your Bubble User’s Unique ID for this (emails can change so aren’t constant)
Insert ID. This is a random string that we will generate in our workflow.
Store. In my app this is the name of the Store/Company who the user is linked to, you might want to call this company.
Domain. In my app this is the domain name of the customer’s store
Email. The user’s email address
Event. This is the event itself that we’re going to track, for example ‘API Error’ or ‘Email Sent To Customer’
(If you would like me to send you a copy of this API call for you to use in your own app just hit reply and I will be happy to share it!)
To initialize our API call we need to put some values in here. Once your API call is initialised we can move on to building our backend workflow.
Building our backend workflow
Next we’re going to set up our master mixpanel-event backend workflow.
We can then call this backend workflow from anywhere in our application to send events into Mixpanel.
There are a few fields we always need to send this backend workflow:
Company. In my case this is the company the current user is connected to, you might have something similar in your app
Event. This is the string of the event itself. Could be something like ‘Email Sent’ or ‘Customer Logged In’ for example
Properties. Sometimes we might want to attach more information to certain events, that is what we will use this field for. You can attach any data you like to events in Mixpanel and it’s super handy for segmenting in your charts later on. This can be an optional field as it doesn’t always need to be included.
Mixpanel backend workflow setup
Our Mixpanel-Event backend workflow is only going to have a single step, which is calling the Mixpanel API endpoint we just set up.
Here’s how we structure those datapoints.
Create a backend workflow which calls the Mixpanel API
Let’s dive into each of these to see how they’re set up.
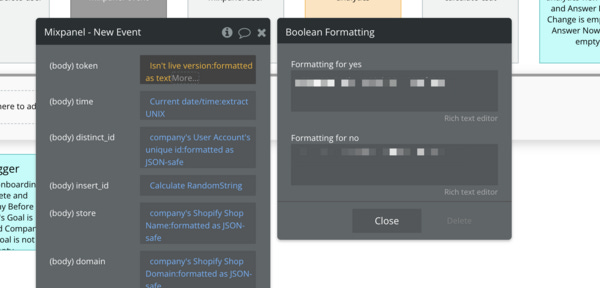
Token. This is the Mixpanel token for the project we want to send our event to. There is a nifty trick here to use either the dev or prod token depending on where your app is being run. Use the ‘Isn’t live version: formatted as text’ operator. We can then put in our dev and prod tokens in the yes and no fields and Bubble will use the correct token for whichever environment you’re in.
Send the right token for your prod vs dev environments
Time. As you can see, we’re using the ‘Current date/time:extract to UNIX’ operator for this
Distinct ID. As mentioned earlier, I’m going to use my user account’
Event. This is the name of the event you want to be able to track in Mixpanel - in the below example the event is ‘Created Answer’ which tells me that the user added an answer option to their survey
Give your Event a name and properties if needed.
Properties. You’re able to attach properties to every event you send to Mixpanel. This is super powerful later on for doing things like segmentation and breaking down your events by property.
A good example of a property being useful is…
When a customer creates a new survey in my app, I attach properties to tell me what kind of survey it was. If it will be sent by email, embedded or a landing page - this is super handy information to know.
You can attach as many properties as you like, you just need to put it in the proper json format, for example..
, "Question Type": This question type: formatted as json, "Survey Type": This survey's format: formatted as json
You can attach as many properties as you like using this method, or none at all. Using the :formatted as json operator ensures whatever data you are sending is going to be formatted properly.
FYI, the reason we have a comma at the start of the above json is that it’s an optional field. It gets appended to the call, so we need a comma at the start to format the jscon correctly.
Sending Mixpanel events for API Errors
One of the most useful applications for mixpanel with Bubble is tracking errors on specific API calls.
To set this up, add a step to call your mixpanel-event backend workflow in the same workflow where you’re using your API.
Then add an Only when… Result of API returned_an_error is yes condition to the mixpanel-event step.
This means that Bubble will only send the event to Mixpanel in the event your API call fails.
Only trigger the Mixpanel event when the API call fails.
To make this extra useful, attach the body of the error message to the Mixpanel event as a property - then you can get a breakdown for each kind of error message response in Mixpanel!
Update: I’ve had a lot of requests for example JSON Body payloads for the Bubble API Connector so I’ve uploaded 2 templates you can use:
Event: Download template
User: Download template
That’s it for this week, I hope you’ve found this issue helpful.
I’ve now sent millions of events to Mixpanel using this workflow and it’s been super handy - I really do recommend looking into it if you’re scaling your app on Bubble.
Do drop me a reply if you have any feedback, I read and reply to them all!
Thanks again for reading and happy building!
James 😁


Hi James, thank you for this post. Really helpful. I faced with the issue that none of the Mixpanel plugins in Bubble works with the projects with the EU data residency. So using the API Connector is the only (and better) option.
Hey James, this is incredibly helpful!!!