

AI-Powered Decision Making: Using DeepSeek with Cloudflare AI and Bubble
How to add AI-powered decision-making to your Bubble app using DeepSeek on Cloudflare AI. It's easier thank you think!

Hey there!
Welcome to this week’s NoCode SaaS newsletter, where I take you along on the journey of building profitable businesses without code using Bubble and AI.
This week, I’m excited to share how you can add AI-driven decision-making to your app without code.
We’ll be using DeepSeek, a reasoning model on Cloudflare Workers AI to analyse data and make decisions—all without even needing an API key!
I’ve put together a simple demo where we’ll build an “agent” that analyzes a supermarket stock report and provides key insights, like identifying items at risk of spoilage and recommending actions to minimize losses.
It’s easy to set up, and I’ll walk you through every step. It’s not as hard as you’re probably thinking!
I’ve recently switched some of the logic in my own app UserLoop over to using this method and it’s an amazing tool to have in your pocket, while working alongside the other LLMs we’ve covered previously like GPT-4o.
I’ve recorded a short video showing exactly how to set everything up, I highly recommend watching it, though I’ve also put together a step by step guide below too.

Why Use DeepSeek on Cloudflare Workers with Your NoCode App?
So why exactly do I think you should consider Deepseek for your app? And how does it work with Bubble?
1. No API Key Needed
With Cloudflare Workers AI, you can run DeepSeek directly on Cloudflare’s infrastructure without needing an API key.
It’s all handled seamlessly within your Cloudflare account.
Plus that means no sending data outside the US/EU, it all runs inside Cloudflare’s network.
2. Incredibly Cost-Effective
Running AI models can get expensive, but Cloudflare Workers AI is budget-friendly. For DeepSeek, it’s just $0.50 per million input tokens and $0.488 per million output tokens.
That’s a steal for the power you’re getting, especially when compared to other AI services.
3. No Code Required
You don’t need to be a developer to set this up. We’ll use AI (specifically, Grok3) to generate the entire Cloudflare Worker code for us.
From there, it’s just a matter of copying, pasting, and deploying.
If you can follow a tutorial, you can do this.
4. Easy Integration with NoCode Tools
Once your Cloudflare Worker is set up, you can easily call it from Bubble, Zapier, or any other platform that supports API requests.
In this demo, I’ll show you how to integrate it with Bubble using the API Connector - it’s super easy.
5. Powerful Reasoning Capabilities
DeepSeek is a reasoning model, meaning it can analyse data, make decisions, and provide structured outputs based on complex criteria.
In my example, it will analyse a stock report, identify at-risk items, calculate potential financial losses, and recommend actions—all in seconds.
What We’re Building: A Supermarket Stock Analyzer
To demonstrate the power of DeepSeek on Cloudflare Workers, we’re going to build a simple “agent” that:
Analyses a supermarket stock report (provided as JSON) here’s a link to the dummy report I used if you want to try it for yourself.
Identifies the top two items at greatest risk of spoilage based on sell-by dates and stock levels.
Estimates the potential financial impact if those items aren’t sold in time.
Recommends two actions to minimise the risk of loss (e.g., discounting items or promoting them).
This is just a starting point—once you see how it works, you can adapt it to analyse any kind of data relevant to your app.
Step-by-Step Tutorial: Setting Up Your AI-Powered Agent
Here’s how to build this in under 10 minutes:
Step 1: Understand the Data
We’ll be working with a sample supermarket stock report that includes:
Item names
Sell-by dates
Cost per unit
Weekly sales rates
Stockroom details
This data will be sent to our Cloudflare Worker as JSON, and DeepSeek will analyse it to provide insights.
Step 2: Choose the Right Model
Cloudflare Workers AI offers several models, but for reasoning tasks, DeepSeek R1 is a great choice.
It’s affordable and powerful enough for our needs. You can find it in the Cloudflare AI Models documentation.
Copy the model name: @cf/deepseek-ai/deepseek-r1-distill-qwen-32b.
Step 3: Generate the Cloudflare Worker Code with AI
We’ll use Grok3 (or any AI code generator) to create the Cloudflare Worker code. Here’s the prompt I used:
I want to make a Cloudflare Worker that uses Cloudflare AI. I want to use the model `@cf/deepseek-ai/deepseek-coder-v2-lite` to analyze my store's stocktake report. Here is an example stocktake report: [paste your JSON stocktake data here].
I want DeepSeek to return a JSON object with:
- The top two items at greatest risk of spoilage.
- The estimated financial impact if those items are not sold.
- Two recommended actions to minimize the risk.
Generate the code for the worker and provide an example input request.
Grok will generate the worker code and an example POST request. Copy the code—it’s ready to use!
Step 4: Set Up Your Cloudflare Worker
Log in to your Cloudflare account and go to Workers.
Click Create a Worker and give it a name (e.g., nocode-stocktake-agent).
In the worker settings, go to Bindings and add a new binding for Workers AI. Name it AI

.
Paste the AI-generated code into the worker’s code editor.
Deploy the worker.


That’s it! Your worker is now live and ready to analyse stock data.
Step 5: Test the Worker
Use the example POST request provided by Grok to test your worker. You can do this directly in Cloudflare’s test console or using a tool like Postman.

Here’s what the response might look like:
json
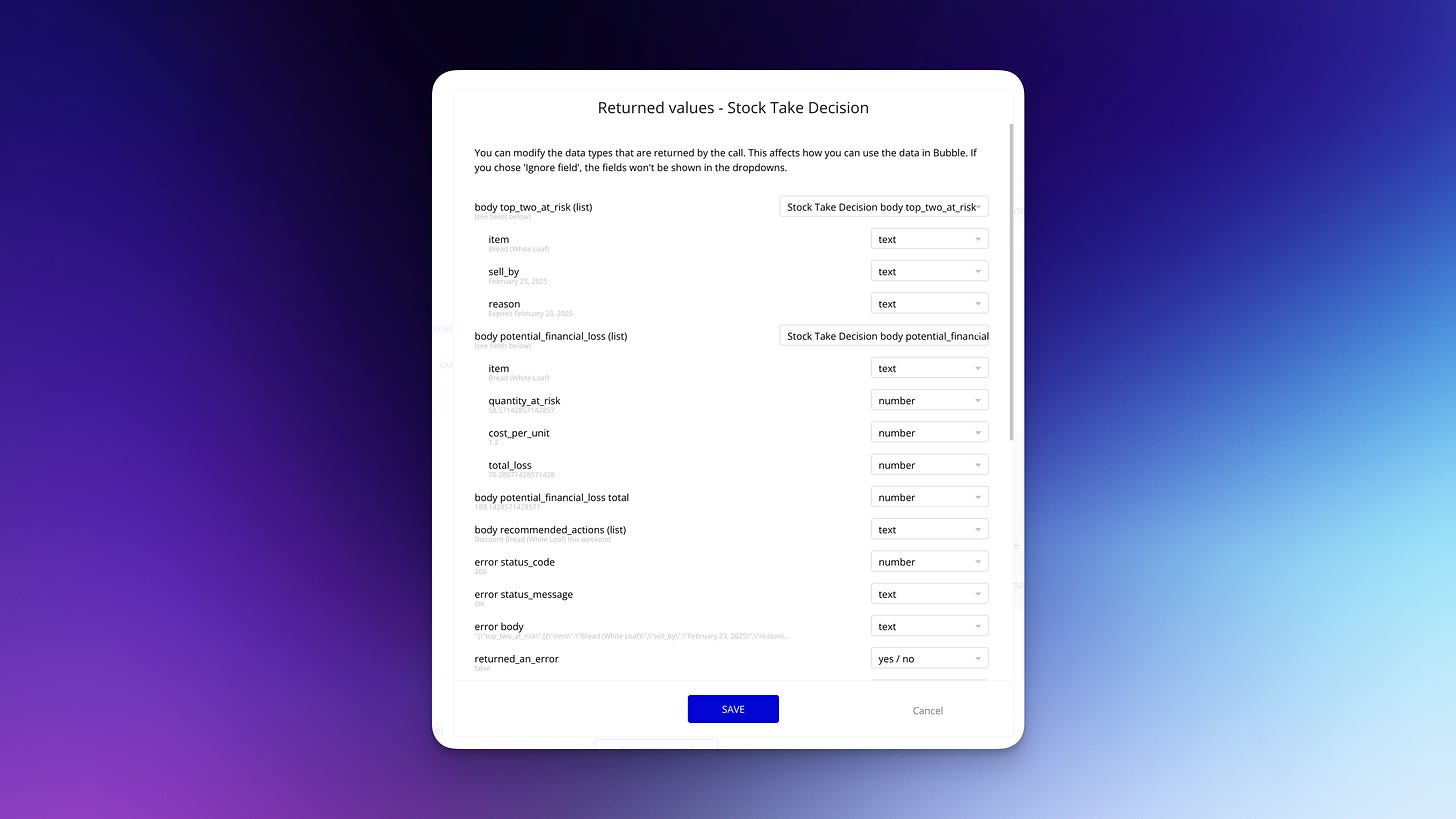
{"top_two_at_risk":[{"item":"Bread (White Loaf)","sell_by":"February 23, 2025","reason":"Expires February 23, 2025"},{"item":"Bananas","sell_by":"February 24, 2025","reason":"Expires February 24, 2025"}],"potential_financial_loss":{"items":[{"item":"Bread (White Loaf)","quantity_at_risk":58.57142857142857,"cost_per_unit":1.2,"total_loss":70.28571428571428},{"item":"Bananas","quantity_at_risk":148.57142857142856,"cost_per_unit":0.8,"total_loss":118.85714285714285}],"total":189.1428571428571},"recommended_actions":["Discount Bread (White Loaf) this weekend","Promote Bananas to clear stock"]}
DeepSeek analysed the data, identified risks, calculated losses, and suggested action, all in seconds.
Step 6: Integrate with Bubble (or Any NoCode Tool)
Now, let’s bring this into Bubble:
In Bubble, go to the API Connector and add a new API.
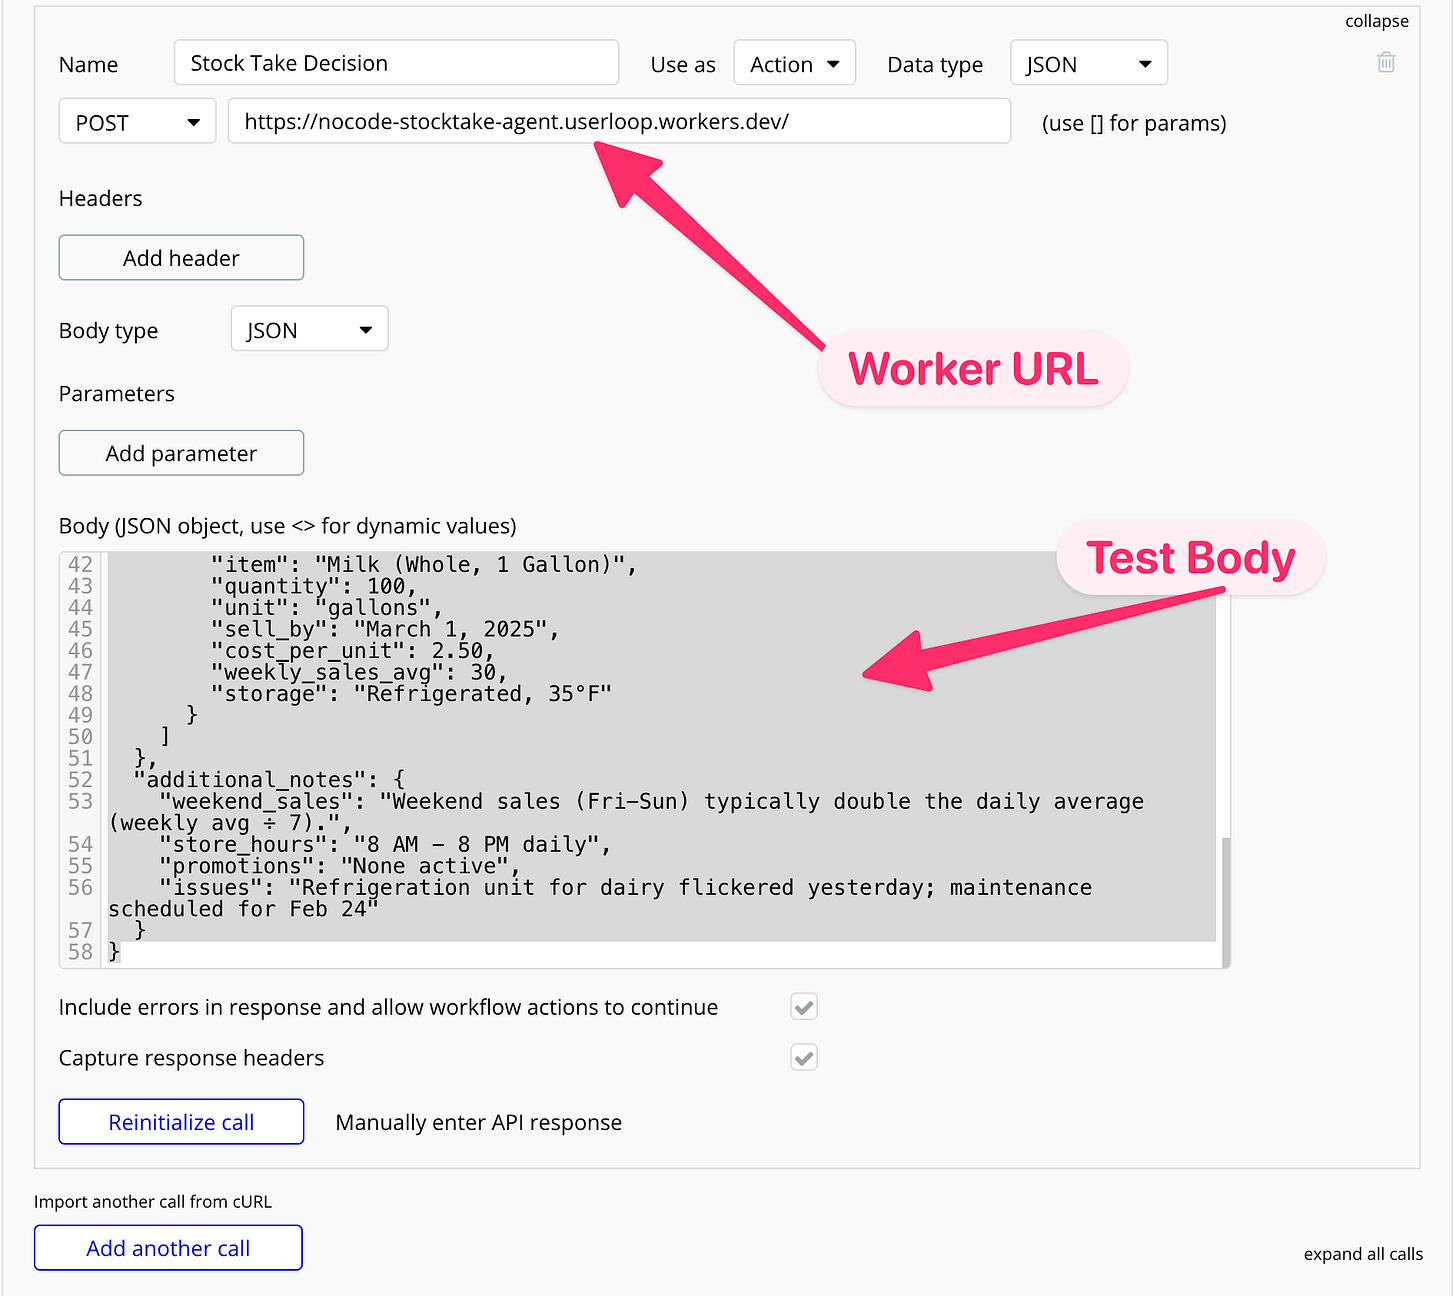
Set it as a POST request and paste your Cloudflare Worker URL.
Use the example JSON body from Groq to initialise the API call.
Save and test the API connection.
Once set up, you can trigger this API call from any workflow in Bubble, passing in stock data and getting back structured JSON with decisions you can display or act on.


That’s it for this week!
This is just the beginning. In future issues, I’ll dive deeper into reasoning models, explore more AI tools, and share how to build even more advanced features without code. If there’s something specific you’d like to see, let me know by hitting reply!
And if you’re inspired to try this yourself, I’d love to hear how it goes. Feel free to reply to this email with your experiences or questions.
Thanks for reading, and happy building!
James
P.S. Don’t forget—early bird tickets for the Create With Conference in London on May 22nd are still available! Join us for a day of talks, tutorials, and networking with top NoCode and AI builders. Get your ticket here.