

Build Your Own AI-Powered Database with n8n and Supabase
Learn how to setup Supabase to store documents with n8n and query them using a chat interface - or even an AI agent. It's easier than you think, I've made a complete guide and video!

Welcome to this week’s NoCode SaaS newsletter.
I wrote a while back about how I loved the idea of the "Self-Driving Startup," which Jonas spoke about at the recent Create With conference (videos coming this week on YouTube)
I already automate tons of the operations for my own SaaS UserLoop and it has helped make it possible for me to grow and run it as a solo founder, it’s truly amazing what is possible now.
I'm going shift the focus of this newsletter to cover more of the tech that makes it possible for a startup to operate autonomously using AI, rather than just how to use nocode tools to build a SaaS
This is the first issue where I am primarily going to be looking at n8n and Supabase instead of Bubble.
n8n is one of the key tools that I believe is going to make the self-driving startup possible for many. It’s a powerful and cost-effective tool, and I’ve built tons of automations that save me hours every day using it.
Today's tutorial is all about building your own custom AI-powered database, often called a Retrieval-Augmented Generation (RAG) system. We recently made our own internal RAG system and it’s been a real eye opener for me, so I wanted to share how you can make your own step by step from scratch.
I’ve covered everything from building the workflow in n8n to creating the vectors in Supabase. I highly recommend watching the video, it starts with a demo of what it can do and then goes step by step with a guide you can follow along.
I’ve recorded the whole process in this YouTube video, from creating your Supabase account and setting up your database, to building your n8n workflow to automatically ingest documents from Google Drive and store them to your Supabase Vector Store.

What this lets you do is train a custom AI on your own private data, like documents from your Google Drive, and then ask it questions about that information.
This is interesting because it allows you to create AI tools that can provide specific, contextual answers from your own knowledge base.
For this tutorial, we'll set up a simple chat interface to ask questions. However, the real potential here, which we can explore in future lessons, is extending this with the AI Agent node in n8n.
An agent could use this knowledge to perform more complex tasks, like pulling structured data out of your documents to use in other workflows.
It’s a lot easier to set up than you might first think, and you can build the entire thing without writing any code. We’ll start from a blank slate and build the n8n workflows to get data in and then query it back out.
You can watch the entire tutorial on YouTube here.
What are n8n and Supabase?
n8n is a workflow automation tool that lets you connect different applications and services together to create automated processes. Think of it like Zapier, but open-source and with more flexibility.
You can use their cloud-hosted version, or you can self-host it, which is incredibly cheap to operate and what we'll be assuming for this tutorial. I personally host mine with Elest.io for $10/month, and it even handles updating the n8n software automatically.
Supabase is an open-source hosted database. It gives you a suite of tools to build backends quickly, including a Postgres database, authentication, and storage.
For our purposes, we'll be using its Postgres database to create a "vector store," which is a specialized database for storing the numerical representations of our text data.
Supabase has a very generous free tier which is more than enough to get started and build this entire project.
Part 1: Ingesting Your Data
First, we need to get our custom information into a database that our AI can use. I'll show you a workflow that takes a file from Google Drive, processes it, and stores it in Supabase.
Before the data is stored, it goes through a crucial step: it's converted into a numerical format called a 'vector embedding' using OpenAI.
This process is what allows an AI to understand the semantic meaning and context of your text, so it can find the most relevant information later when you ask it a question. Think of it as creating a special map of your data that the AI can read.

The basic workflow looks like this:

Trigger when a new file is added to a Google Drive folder.
Download the file and extract its text.
Encode the text into a numerical format (called an "embedding") using OpenAI.
Save the encoded data into our RAG database in Supabase.
Step 1: Setting Up Your Supabase Project
Head to Supabase and select "New Project." Give it a name (e.g., "n8n-rag-tutorial") and a strong password. Make sure to save this password, as you'll need it later.
Once the project is ready, you need your API credentials.
Go to Project Settings > API. Copy the URL (Host) from the Project URL field and the service_role secret key from the Project API Keys section. These will let n8n connect to your database.
Step 2: Preparing the Database in Supabase
Our AI needs a specific type of table to store the data and its embeddings. The n8n documentation makes this straightforward.
In the Supabase Vector Store node documentation within n8n, there is a "Quick Start" section with a ready-made SQL script.
Copy this script.
In your Supabase project, go to the SQL Editor, paste the script into a new query, and run it.
This creates a new table called
documentswith all the necessary columns (content,metadata, andembeddings) already set up. Your database is now ready to receive data.

Step 3: Building the Ingestion Workflow in n8n
Now, let's build the n8n workflow to populate this database.
Get the Data: Start with a Google Drive node set to "Download File." Point it to a specific Google Doc you want to use. Make sure to set the Google File Conversion to download the doc as plain text.
Extract Text: Add an Extract from File node to get the raw text from the downloaded binary file.
Upsert to Vector Store: This is the main step. Add the Supabase Vector Store node.
Action: Set the action to
Upsert.Credentials: Connect it to the Supabase account using the Host and Service Role Key you saved earlier.
Embeddings: You need to tell n8n how to encode the text. Select
OpenAIas the embedding tool and choose an embedding model liketext-embedding-small.Metadata: This is useful for filtering later. Add a metadata field, for instance,
typewith the valuedoc. This way, you can have the AI query only documents if you add other data sources like tweets in the future.
When you run this workflow, n8n will download the file, extract the text, convert it into embeddings, and load it into your Supabase table. If the document is long, the text splitter will break it into smaller chunks, creating multiple rows in your database.
Part 2: Querying Your Data with an AI Agent
With data in our database, we can now set up an AI agent to chat with it.
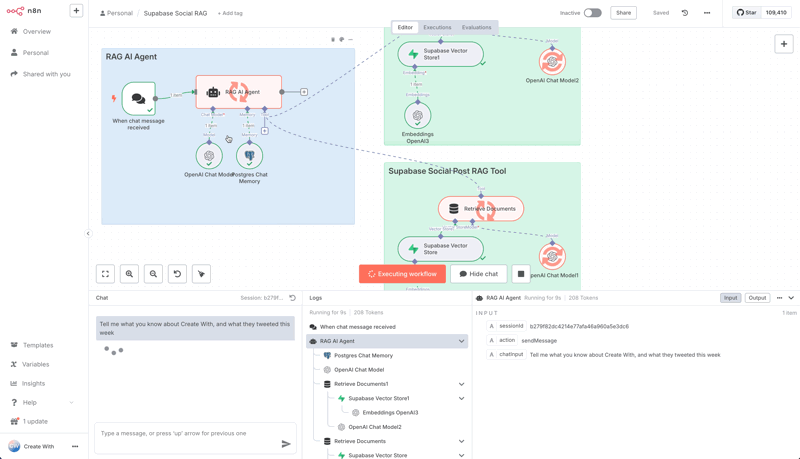
Step 4: Creating the Chat Workflow in n8n
Chat Trigger: Start with a trigger node, On Chat Message, which provides a simple chat interface for testing.
AI Agent: Add an AI Agent node. Here, you'll configure the main AI model, for example,
OpenAI GPT-4.1.Memory: To remember the conversation history, the agent needs memory. For this, we'll use our Supabase database. Select the Postgres memory option. You'll need to create a new credential for this.
Go to your Supabase project's Database settings and find the Connection string. Copy the Host, Database name, User, and Port details into the n8n Postgres credential configuration. For the password, use the main project password you set up in Step 1.
Step 5: Giving Your Agent the Right Tool
An AI agent needs tools to perform actions. We need to give it a tool to access our custom knowledge.
In the AI Agent node, go to Tools and add the Supabase Vector Store.
Name & Description: This is important. Give the tool a descriptive name like
Company Documentsand a clear description likeContains documents about the Create With conference. The AI uses this description to decide when to use this tool.Configuration: Connect it to your Supabase credentials, select the
documentstable, and point it to your OpenAI embeddings model, just as you did in the ingestion workflow.
Step 6: Asking Your First Question
Now you're ready to test it. Activate the workflow, open the chat panel, and ask a question related to the document you uploaded, like, "What do you know about the Create with conference?"
The AI agent will:
Receive your question.
Analyze it and determine the "Company Documents" tool is the best way to find the answer.
Use the tool to query your Supabase vector database.
Receive the relevant text from your original document.
Use that text to form an answer and display it in the chat.
That’s it for this week!
You've just seen how to take text content, load it into a vector database, and build a custom AI agent to query it, all without writing any code!
You can expand this by adding data from websites, Twitter, LinkedIn, and more. The setup is also quite inexpensive to run, using the free tiers of the tools. I’m using it for all sorts of things now and it’s amazingly powerful.
In the next edition I’ll dive a bit more into loading in data from other sources like Twitter, and building an AI agent which can complete tasks using intelligence it can get from your vector store.
I hope you found this helpful. Let me know if you end up trying this method!!
Until next time, happy building!
James