

💾 Allowing users to export data from your Bubble app - NoCodeSaaS Issue #23

Hi there,
Hope you’ve had a great week. It’s been an exciting one for developments on Bubble’s new responsive engine. We got a ton of new conditional controls for things like margins and alignment, and yesterday the ability to drag responsive around using the elements tree.
I’ve had a very busy month migrating my entire app to the new responsive engine and refactoring the data structure to add a ton of features. You can read about everything I added here if you’re interested.
This week’s newsletter is a deep dive into the mechanics of one of the features I added… bulk CSV downloads.
This was a heavily requested feature from my users, and up until now I had been doing their data exports by hand and sending them to them by email.
I decided to make exporting data fully self-service so they can do it themselves.
Adding this feature as a paid-only feature has driven a significant number of users to move onto a paid plan - people love being able to easily export their data and will pay for it!
Initially, I tried implementing this feature only on the front end. It worked fine for a small number of records, however as soon as you tried to export thousands of records to CSV it would crash the browser.
Therefore I have moved the entire CSV export process to be a backend workflow which runs server-side.
This gives the job much more compute power to run, and means it’s able to process large amounts of data without a problem.
Let’s take a look at how to set this up in Bubble.
Demo
I’ve put together a video showing how this feature looks to an end-user below to give you a feel for how it works, click here to watch it.

Wath the demo of this feature in action in my app.
App UI & Custom Timeframes
The first thing you need to set up is an element in your app where a user can request their data export.
In my case, I decided to create an export modal that you can trigger when on the ‘Responses’ page of the app.

My export responses modal
This modal lets the user customise a few things aboue their download, such as what time range they would like data to be exported over.
To do this, my app has a custom Option Set called ‘Timeframes’.
Each timeframe has a display name, and a numeric value for number of days to go back.
For example…
Last 30 days (-30)
Last 60 days (-60)
Last year (-365)
I then have a dropdown in my UI which loads lall my ‘Timeframe’ options and lets the user pick one.
To calculate how many records are going to be exported, I then do a search for the data with the rule…
Created Date > Current date/time+Dropdown Timeframe’s Days

Search for all records limited by the user's selected timeframe.
This will then return a count for how many records were created in the last X days, telling your user how many records will be included in their download.
I then have an ‘Export Responses’ button. When this is pressed, it schedules an API Workflow to a backend workflow called ‘Export Responses’
It passes the current user, timeframe as variables, so the backend workflow knows what data to look for when it runs the export.
I then show a toast message letting the user know their request is being processed and their data will be sent to their registered email address.
Installing & Configuring the Plugin
To gather our user data and turn it we need to install an external plucin.
1T - CSV Creator Plugin by Eli is the one I selected after some research. It’s extremely powerful and flexible, and can deal with some more complex data structures which require joins / secondary searches.
Once you’ve got the plugin installed, we can start work on our backend workflow to generate the CSV.
Generating the CSV File
Below is an overview of the finished backend workflow for exporting data from my app, let’s take a look at each step in detail.

The backend workflow for exporting data from your app
The first step is utilising the CSV plugin with the action Create CSV from JSON (SSA).
As you can see, this plugin relies on using a bit of JSON to collect your data.
Don’t be intimidated by this, there are lots of examples in the plugin documentation.
The first thing you need to do is build a search for the data you wanted using the variables you passed through from the front end to your backend workflow.
We then want to take that list of results and use the operator :format as text
This will split out each result and allow us to turn it into a nicely formatted JSON object.

Search for responses and format the results as text
This is where we need to write a bit of json to structure our data properly.
A basic example of a json structure is included with the plugin…
{
“Sale Date”: “This Sales’s Order Date”,
“Sale ID”:“This Sales’s Order ID”,
“Items”:[“This Sales’s Items”],
“Region”:“This Sales’s Region’s Name”
}
You need to change each of these fields to match whatever your app’s data is. As a cheat, you can get out of using “ marks on the value if you use the Bubble operator :formatted as json safe.
I have done this in the example below. This also means Bubble will make sure no disallowed characters slip through and end up breaking your export.

Structure the data you want to export as JSON
Where you want to include a list of things in a single field in the export, you need to use square brackets.
In my example above, you can see I’m doing this in the Items and Responses fields. This means I’m running a secondary search to get linked data and put it in those fields.
Here’s how that looks…

For lists of items within a field, use a secondary :format as text operator
That will go and do a search and add a list of things into that field. This makes this technique for exporting data particularly powerful.
Generating the CSV File
Once you’ve done that first step and searched for all your responses and formatted them correctly - we need to go turn that into a CSV file we can email to our users.
To do this, we need to create the next step in our workflow using the CSV Creator - New Private File from Base64 action from the plugin we installed.

Generate a CSV from the data you created in the previous step
Here’s how the setup for that looks. We need to tell the plugin our website’s home URL, give the CSV file a title, and pass it the output from the first step of our workflow.
If you want to add an extra layer of security to your file, enable private mode. You can then attach the file to a unique entity in your database to make it private.
In my case I link it to the user’s company.
This will then create the CSV file and upload it to your app’s web storage, giving it a unique URL.
We’ll use that URL in the next step to allow the user to download the efile.
Send the CSV File by Email
Next we need to email the file to the user once the processing is complete and the file has been generated and uploaded to storage.
In my example I’m sending an email using Postmark and a template. You can read more about how to set this up in this previous issue.
The main things to see are that we are sending a email to the user who requested the export, and injecting the link provided to us by the previous step in the workflow.

Compose an email with all the info for the user to download the file.
Here’s how that email looks when it hits the user’s inbox…

User can now download their requested data.
Schedule the uploaded file for deletion
As an optional extra step, you can also schedule your file to be deleted in 24 hours.
This is good from a security + privacy perspective, and stops your Bubble account from storing lots of data which is no longer needed.
To achieve this, I create a secondary workflow whos job it is to delete th CSV file we created.
I call this workflow delete-data-export and it only requires one field to be scheduled, the URL of the file we created.
Here’s the preview of that workflow, as you can see it only has a single step, which is to delete an uploaded file.

Workflow to delete the uploaded file
Now obviously, we need to schedule this delete workflow to run when we initially create our CSV file in the first place.
This is the final step in the creation workflow. It schedules the delete-data-export workflow to be run in 24 hours.
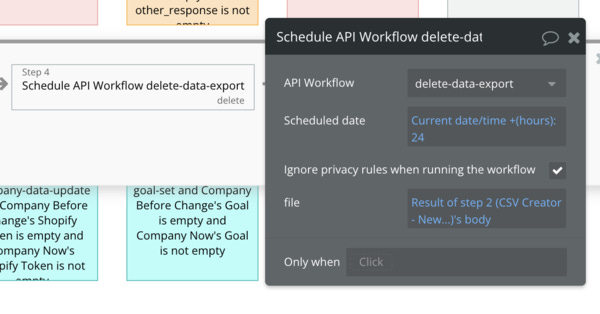
This means, 24 hours after we generate this file and email it to the user it will be totally deleted from our Bubble files.
That's it for this week!
I hope you found this issue interesting and helpful, please do hit the reply button and let me know - I always love to hear your feedback and suggestions on other topics you’d like me to cover.
Until next time, happy building!
James